|
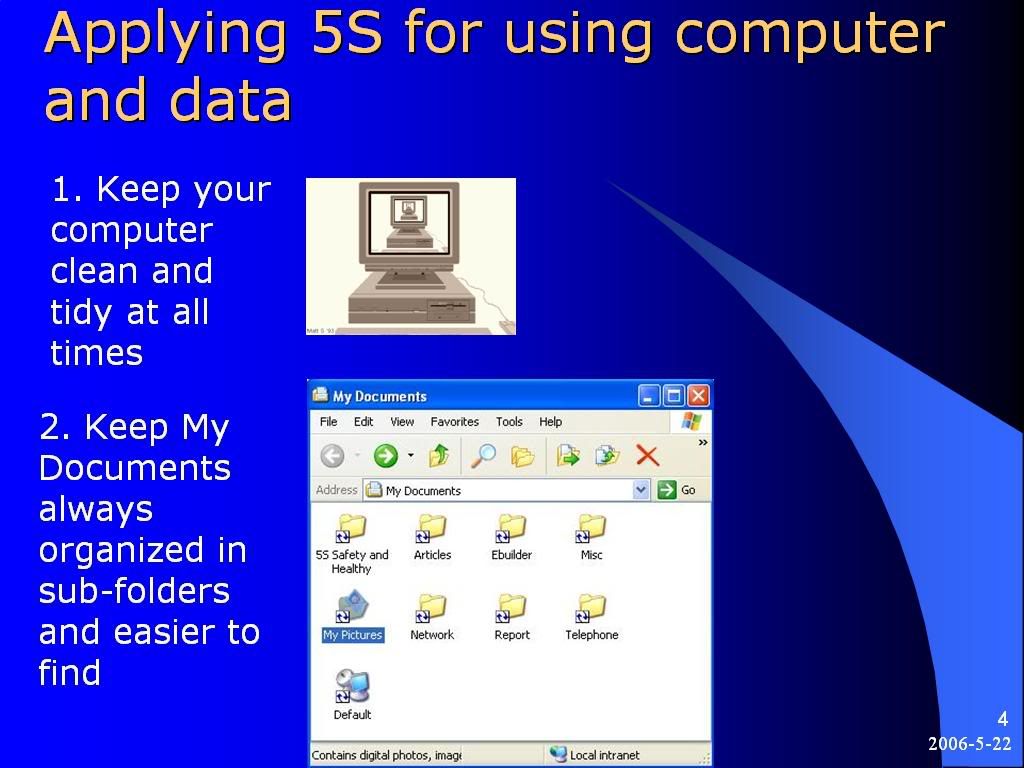
查看: 22890|回复: 46
|
WIN2K3-安裝Domain Controller, DNS Server﹐DHCP Server和使用GPO[更新:19/3/2007]
[复制链接]
|
|
|
*本文的特點是我會使用英文來解釋很多特點和名詞,其目的是為了更有效說明和容易明白.

前言
這篇文章的目的是說明安裝Domain Controller步驟和注意事項, 安裝DHCP Server管理IP Addresses, 安裝DNS Server管理Domain Name和使用Group Policy Object(GPO)來管理Domain Users & Computers的設定.
本文剛要:
1. 第一篇 簡介
2. 第二篇 安裝Active Directory和DNS Server
3. 第三篇 安裝DHCP(Dynamic Host Configuration Protocol) Server
4. 第四篇: 使用Active Directory
5. 第五篇 設定Client Computer登錄Active Directory和共享文件(Shared Documents)
6. 第六篇 使用GPMC來編輯GPO
第一篇 簡介
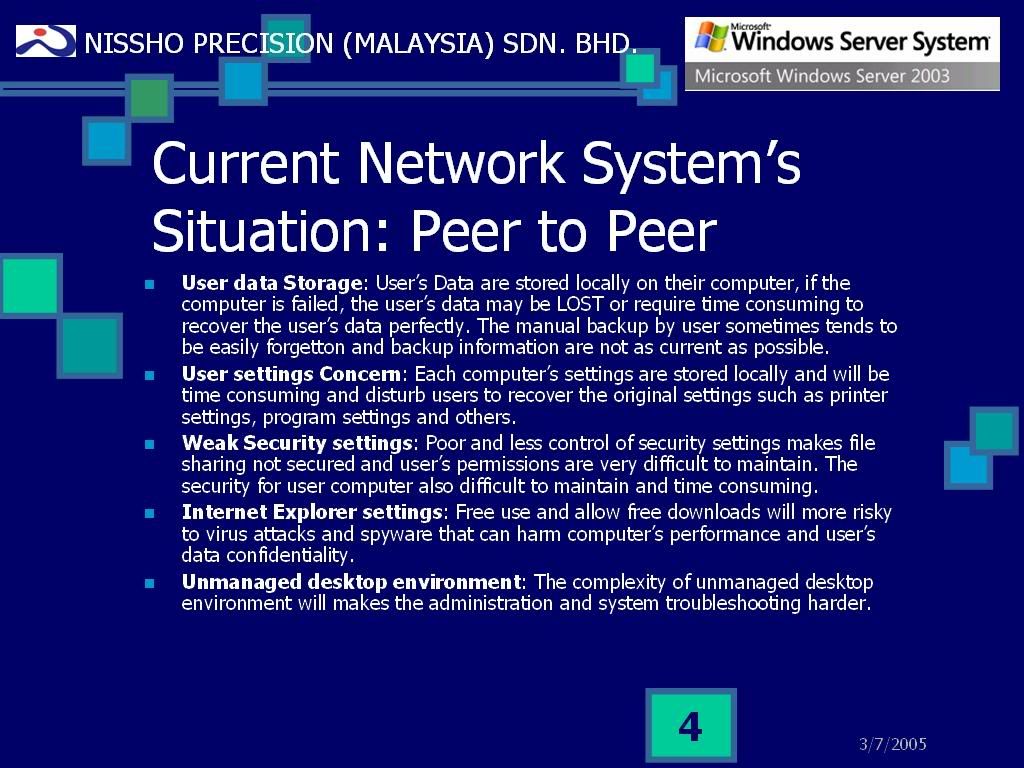
首先,讓我們想像使用Peer to Peer(P2P)網絡的環境.這個網絡大約有20個電腦,每個電腦使用者都擁有管理員的權限(Administrator Rights), 他們使用共享文件(Shared Documents), 使用Internet來接收Email(Receive & Send Email)和搜尋資料(Search information ), 使用各種的應用程式(Applications). 他們也使用各種不同的網絡服務(Network Services).這種網絡是屬於無管理性工作環境(Unmanaged Desktop Environment).
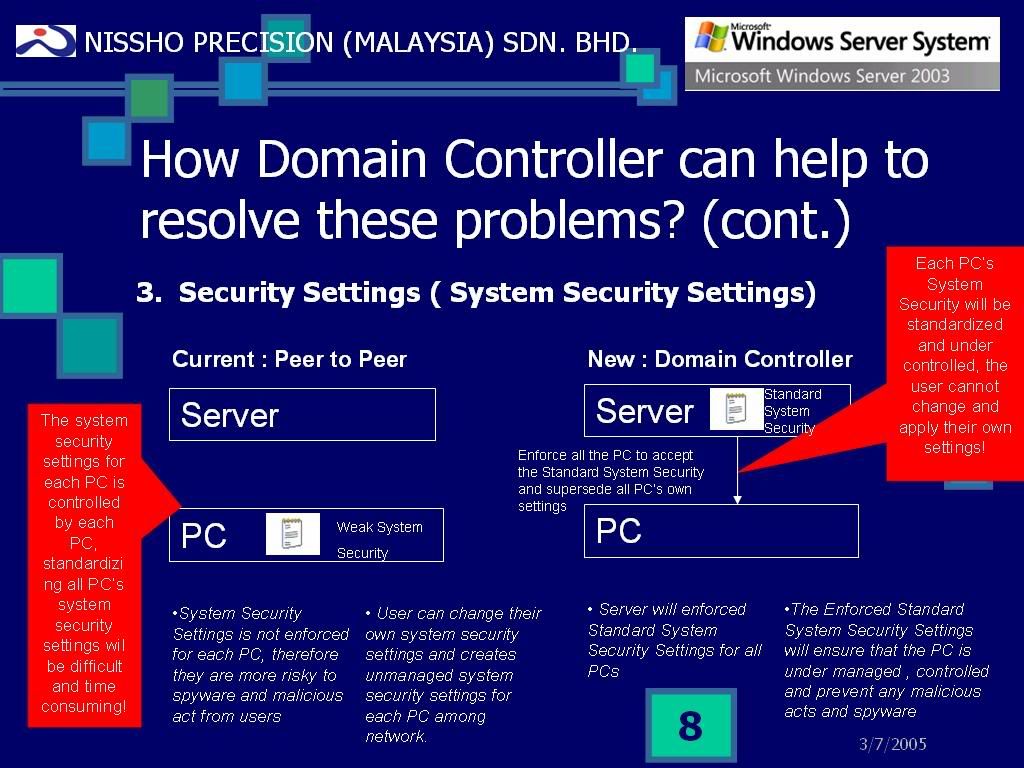
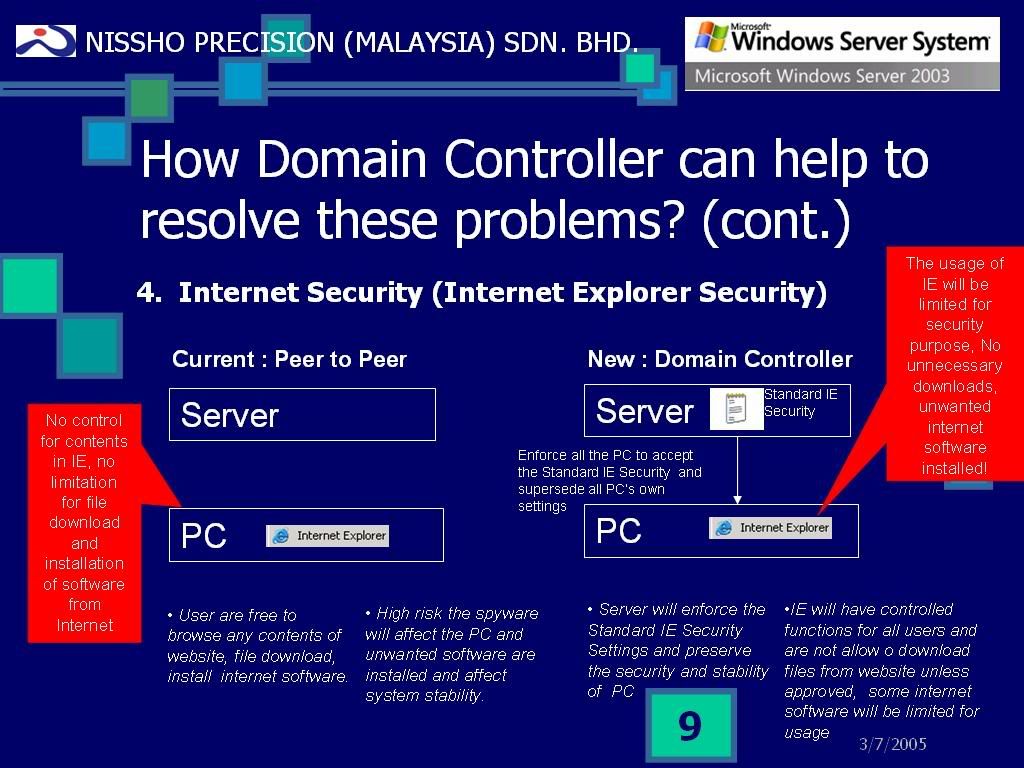
無管理性工作環境是一種沒有受到標準管理的環境,而使用者可以任意使用或更改系統.沒有受標準管理的部份包括系統安全和設定,應用程式和其他網絡服務.
Unmanaged Desktop Environment is an environment without standardization, users can use/change systems without controls, and those include system security& settings, applications and other network services.
P2P網絡面對這些問題:
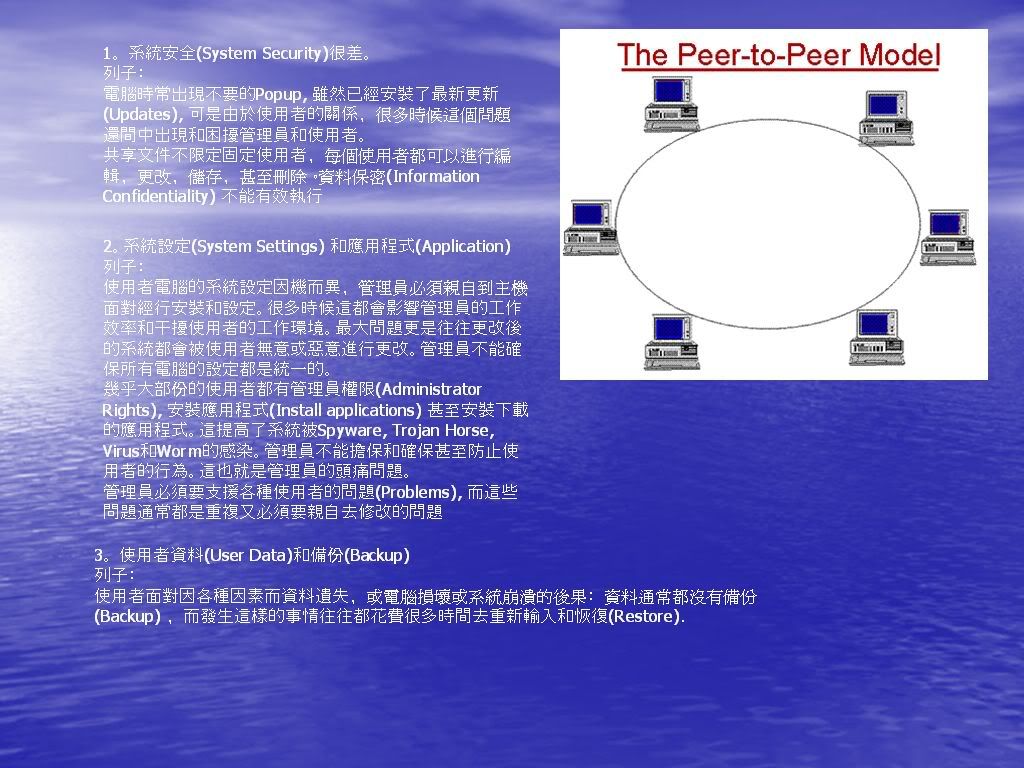
以上都是一些常出現的問題,種種的因素都造成管理上的困難,而在大型網絡裡面有幾百甚至上千的電腦需要管理時,以上的問題就是管理員的惡夢(Nightmare).
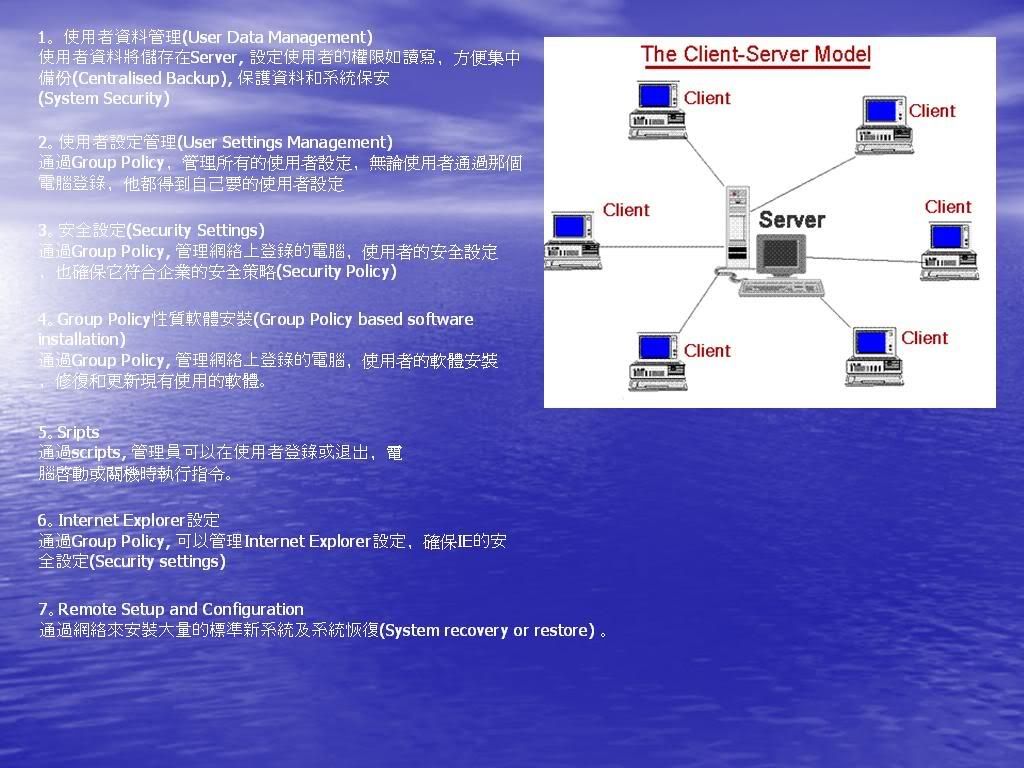
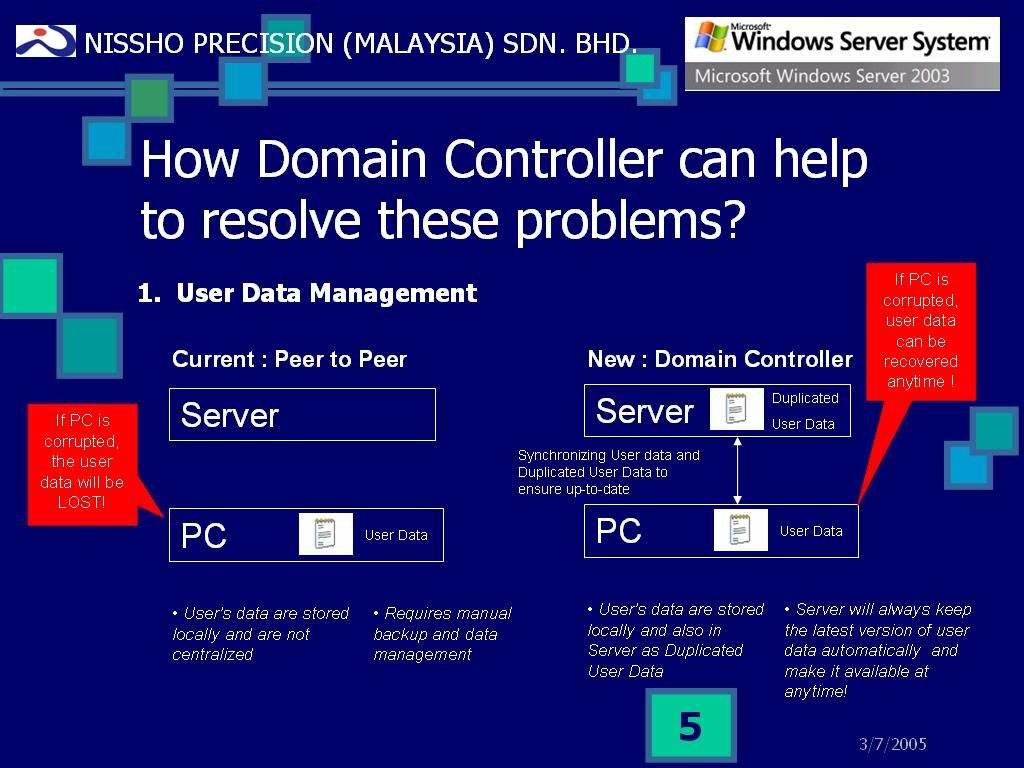
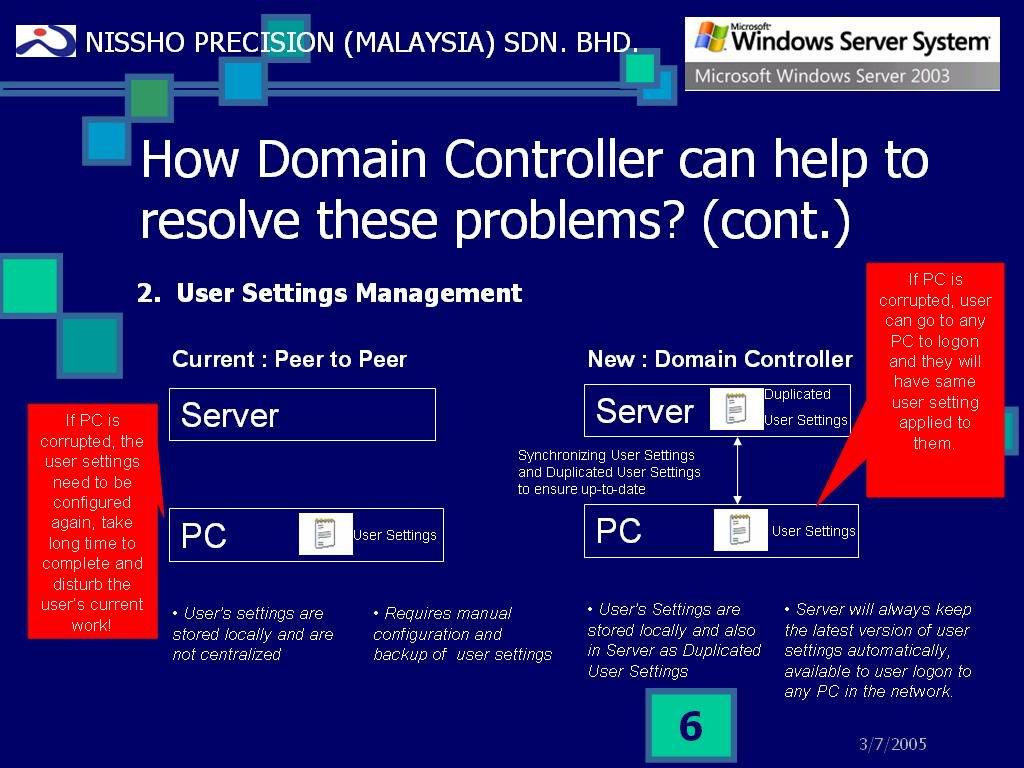
所以Microsoft採用了Active Directory(Domain Controller)+GPO來管理Windows網絡(Windows Network), 解決P2P網絡所面對的問題。Active Directory是屬於Client-Server網絡,亦即是她需要一個完整專用(Dedicated)Server來管理所有網絡上電腦(Computers)和使用者(Users) 和其他網絡裝置(Network Objects).Clients就是使用者電腦(User’s Computer), 必須登錄Server,通過驗證(Authentication),才可以使用Server所提供的服務.加入Domain的User是必須遵照Domain Security Policy設定, 而使用者沒有權力更改這些設定, 這樣就可以建立管理性工作環境( Managed Desktop Environment).
管理性工作環境(Managed Desktop Environment)提供標準,有系統化的管理網絡電腦,使用者和其他網絡裝置,以達到統一的使用環境和功能.
Managed Desktop Environment provides standardized, systematic ways to manage computers, users and other network objects, so that to achieve standard, unified computing environment and features.
系統配備﹕
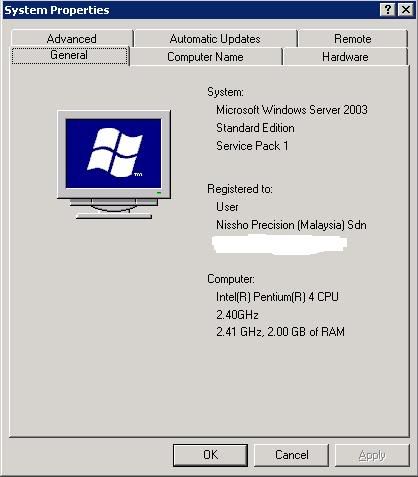
CPU: Intel Pentium 4C 2.4Ghz with HT Enabled
RAM: 4x512MB Dual Channel DDR400, Total: 2.0GB RAM
Harddisk: Maxtor 6Y080M0 with 8MB Cache X2 (Running as RAID1)
OS : Windows Server 2003 SP1 Standard Edition
Network Services installed:
Active Directory/Domain Controller: Yes, running
DNS Server: Yes, running
DHCP Server: Yes, running
Application Server/IIS: Yes, running WSUS Port:8530
File Server: Yes, running
Terminal Server: Yes, running, Port:3389
Remote Access/VPN Server: Yes, running
WINS Server: Yes, running
Apache Web Proxy Server: Yes, running Port:8080
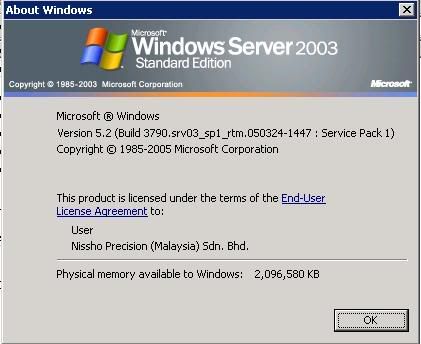
系統需求:
OS: Windows Server 2003 Standard Edition SP1[32-bit]
CPU: Minimum 133Mhz processor, 550Mhz or higher recommended, maximum support 4 Processors per server
Memory: 128MB Required, 256MB or more recommended, maximum 4GB
Harddisk: 1.25-2GB Harddisk space required.
Drive: CD-ROM or DVD-ROM drive required
Display: At least Super-VGA 800x600 required.
Network Interface Card: Network card to support 10/100/1000 mbps or higher.
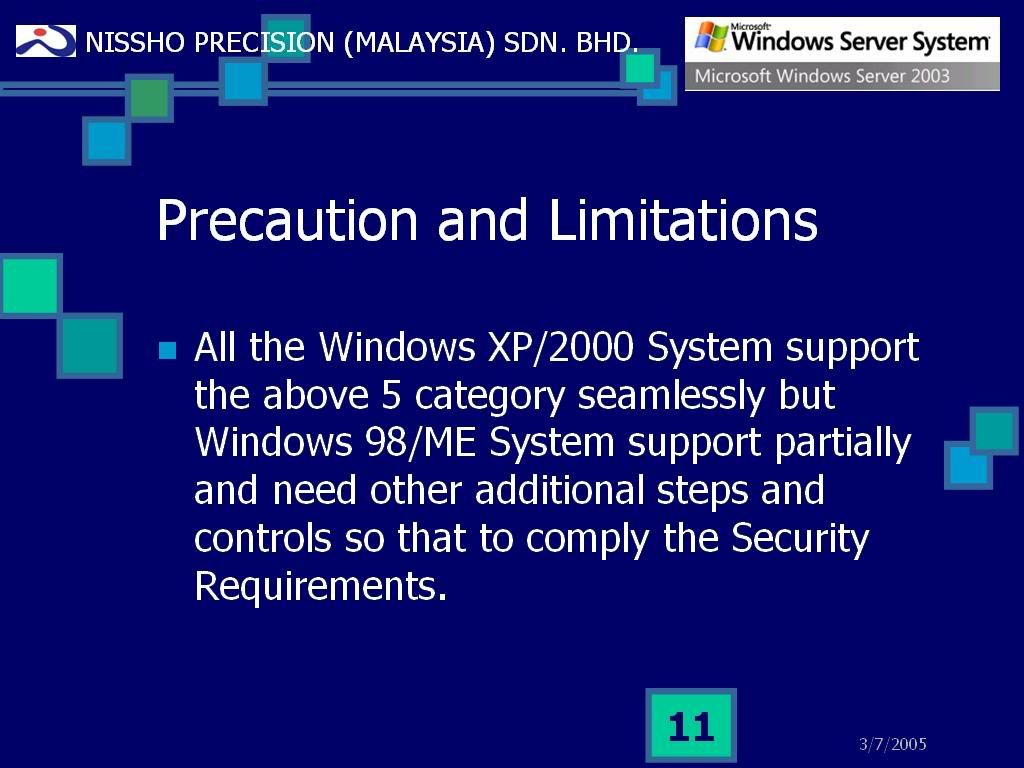
支持Client Operating System:
1. Windows 2000 Server/Professional (Active Directory+GPO)
2. Windows XP Professional (Active Directory+GPO)
3. Windows 95, 98, 98SE, ME (Active Directory only)
4. Windows NT4 Server/Workstation (Active Directory only)
*不支援Windows XP Home Edition, 因為它不能加入Domain和不支援GPO.
需要軟體:
Server需要軟體:
1. Windows Server 2003 Service Pack 1
網址:http://www.microsoft.com/downloa ... &displaylang=en
大小:329.3MB
版本:SP1
日期:30/03/2005
費用:免費
2. Group Policy Management Console with Service Pack 1(GPMC)
網址:http://www.microsoft.com/downloa ... &DisplayLang=en
大小:5.6MB
版本:1.0.2
日期:15/06/2004
費用:免費
Client需要軟體:-
1. Active Directory Client Extension (for Windows 98, 98SE, ME, Windows NT4)
網址:http://support.microsoft.com/kb/288358
大小:-
版本:-
費用:免費
*有鑒于Windows 9X/NT4系列系統不直接支持Windows Server 2003 Active Directory, 你需要在事前安裝這個軟體才可以登錄.
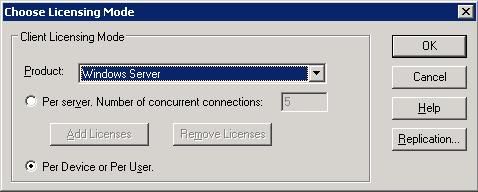
Windows Server CAL(Client Access License):
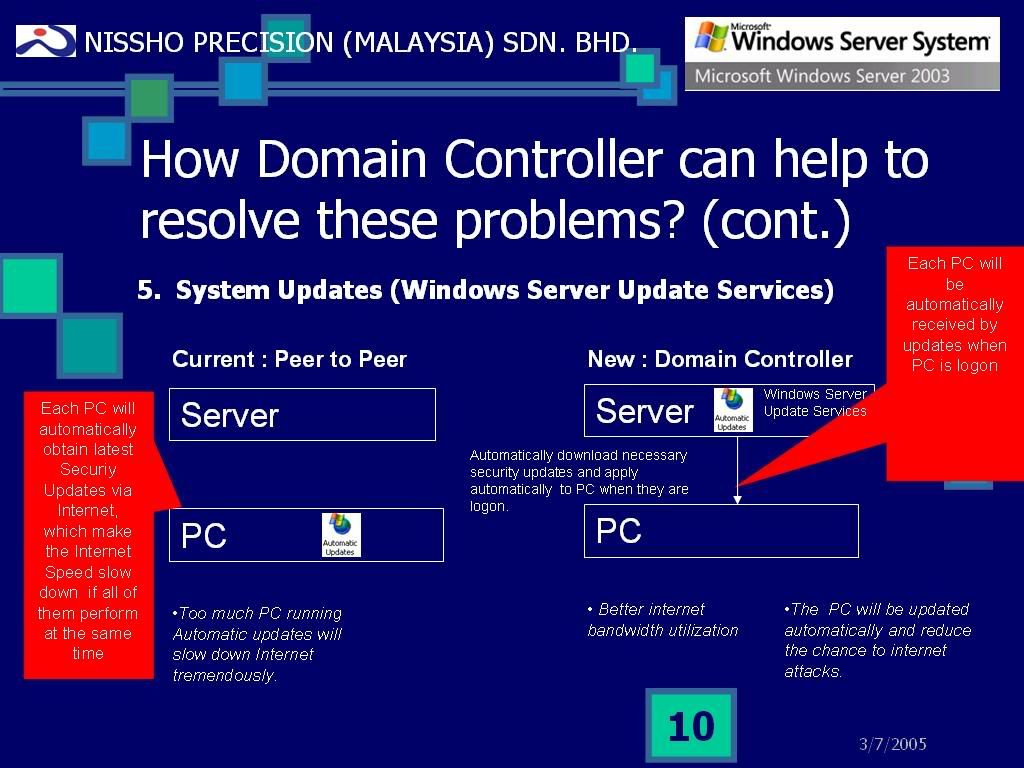
任何登錄Active Directory的電腦或使用者都必須要有CAL.Windows Server CAL可以在Windows SharePoint Services(WSS)和Windows Server Update Services(WSUS)使用.關於WSUS,可以參考我的作品:
使用WSUS自动更新及管理Domain Computers的安全补丁:
http://chinese.cari.com.my/myfor ... ge=1&highlight=
Windows Server CAL可分為兩種:
1. By User: CAL數目是根據登錄使用者(Login Users)的數目而定
2. By Device: CAL數目是根據登錄電腦(Computers used to login)數目而定
安裝前準備事項:
硬體和軟體準備(Hardware and Software Preparation):
1.安裝Windows Server 2003, 安裝過程簡單.本文沒有詳細的說明. 請也安裝最新的Service Pack.
2.安裝GPMC.
3.準備好需要的Windows Server CAL數目, 你需要確保購買足夠的CAL數目, 否則的話是會觸及合法使用條件.
安裝CAL﹕Start -> Control Panel -> Licensing
4.準備好備份裝置(Backup Devices),目的是用來備份使用者資料(Users Data)和系統設定(System Settings).
5.將Active Directory Client Extension安裝在所有要加入Domain的Windows 9X/NT4電腦.
6.確保在安裝Active Directory(Domain Controller)時,所有使用者沒有使用這個Server, 如果你之前的系統是屬於Peer to Peer, 那麼你在安裝後要有足夠時間來設定使用者電腦加入Domain和將使用者資料轉入新的系統.
使用者資料和系統轉換準備(User Data and System Change Over Preparation)
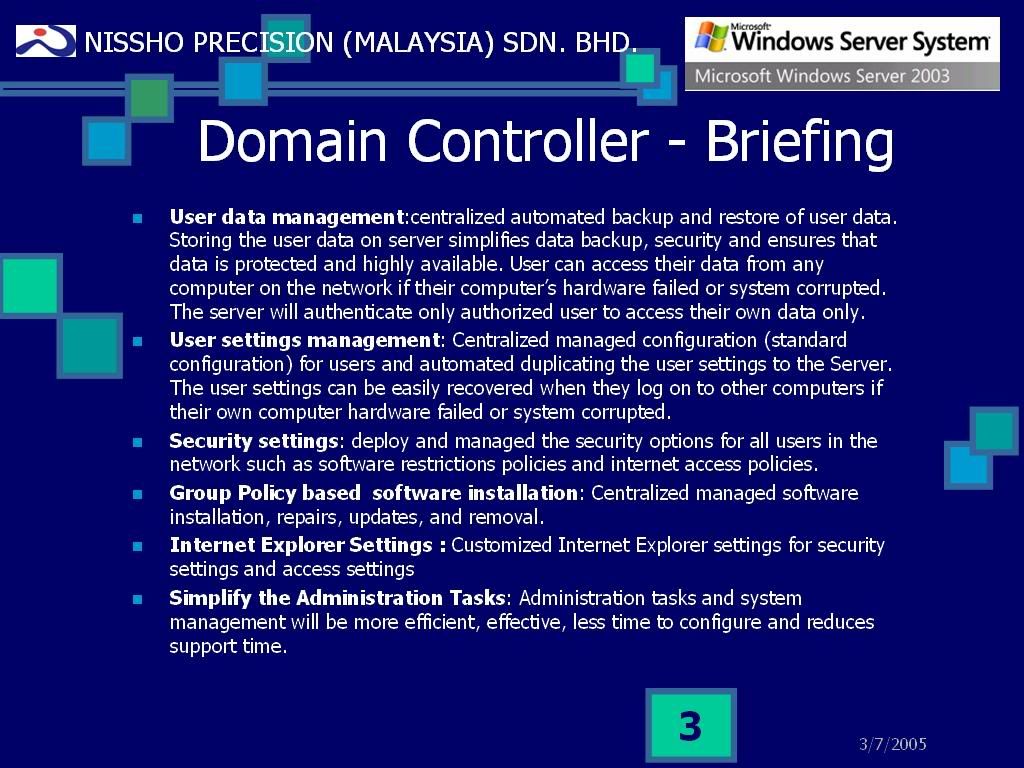
1.向管理層(Management)解說新系統的功能,好處和解決問題方案並得到批准(Approval)和支持(Support).
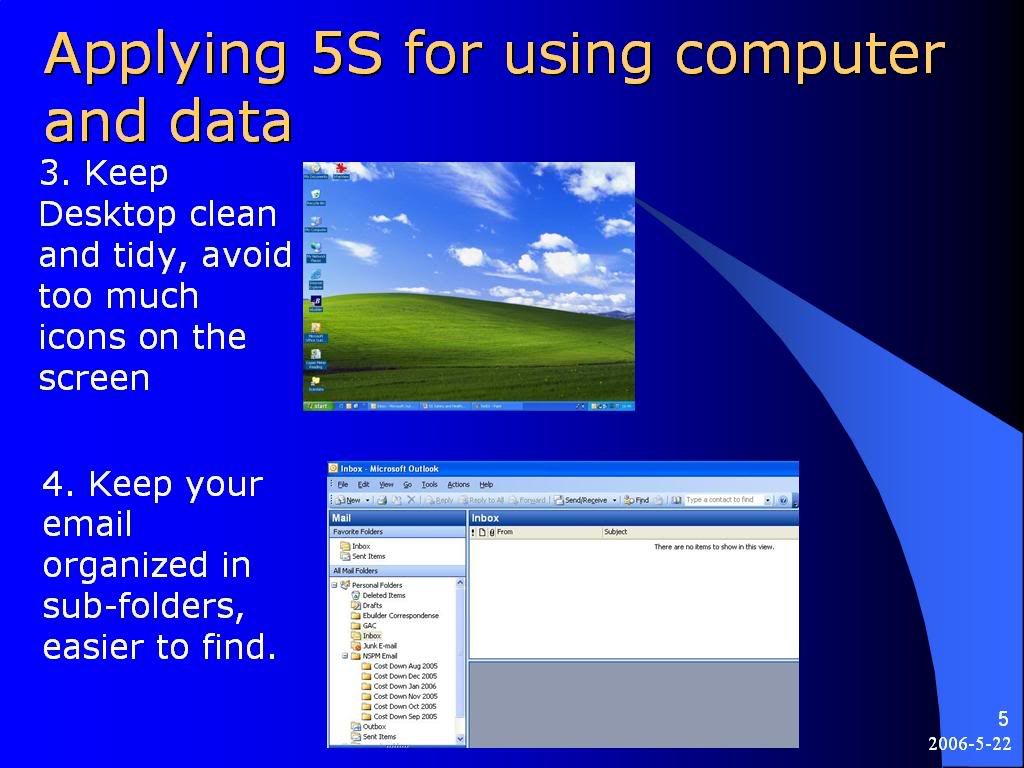
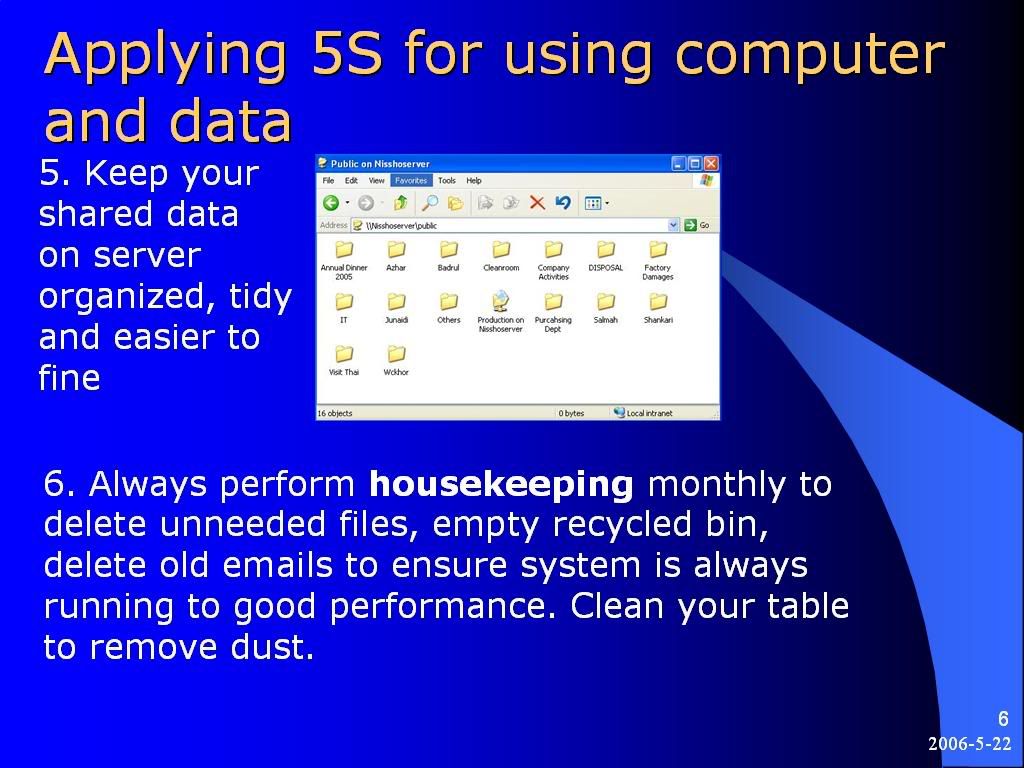
2.向各部門主管(Head of Department)和使用者(Users)解說新系統的好處和新系統所帶來的改變(Change),讓他們明白和做好心理準備和配合.我們可以通過展示(Presentation) 和解說資料(Briefing information)來轉達新系統的操作方式和好處。就如圖下列子:
3.收集(Collect)和考查(Study) 現有的網絡使用者資料,準備好所有使用者資料,選擇一個適當的時間進行實行(Deployment), 並且通知各使用者其實行日期﹐並準備好實行後的支援工作(Support Task).
4.記錄(Record)所有系統的實行過程(Deployment process),並將之收在系統記錄(System Documentation)當中,方便以後參考(Reference).
5.當一切準備就緒後,我們就可以開始安裝Active Directory了.
[ 本帖最后由 goolb78 于 19-3-2007 09:43 PM 编辑 ] |
评分
-
查看全部评分
|
|
|
|
|
|
|
|
|
|
|

楼主 |
发表于 16-4-2006 03:00 PM
|
显示全部楼层
第二篇 安裝Active Directory和DNS Server
此安裝是參考這個網頁,並加以說明和翻譯.
Creating the first Windows Server 2003 Domain Controller in a domain:
http://www.visualwin.com/AD-Controller/
注意事項:此安裝是設立新的Active Directory和DNS Server. Active Directory需要DNS Server才能真正使用.由於本文是說明設立第一個的Active Directory, 那麼精靈(Wizard)也自動的安裝了DNS Server. 如果你網絡已經有DNS Server,你可以使用該DNS Server而不需要安裝.
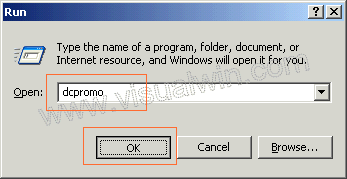
1.Start -> Run
2.輸入“dcpromo” 然後按 “OK”.
3.按“Next” 繼續.
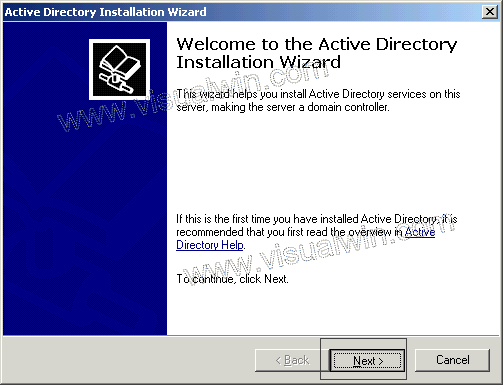
4. 按“Next” 繼續.
5.
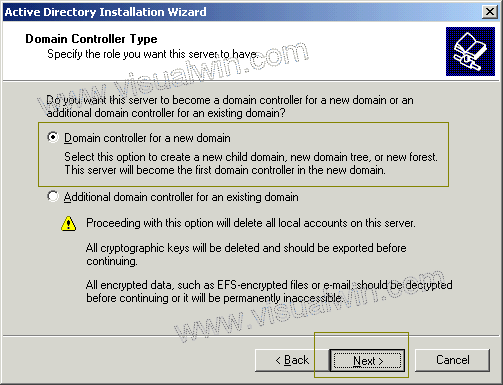
由於這是第一個Active Directory, 選擇”Domain controller for a new domain” 然後按“OK”
如果你已經擁有Active Directory, 要添加新的Active Directory, 請必須要詳讀注意事項。
6.
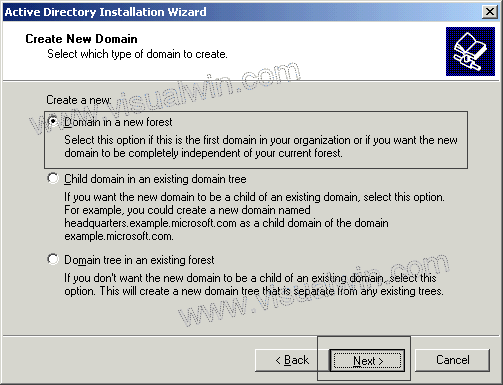
選擇”Domain in a new forest”, 因為這是新的Domain Controller. 按”Next” 繼續.
7.
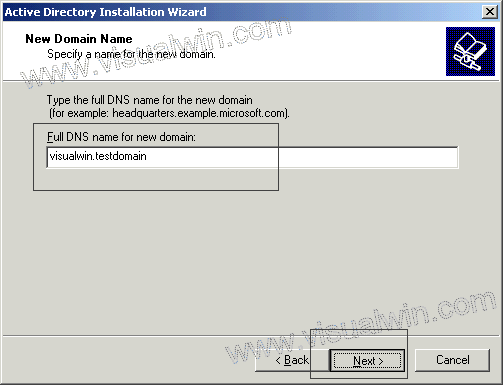
輸入你要的Domain名字。這時你可能會混淆,以為Website Domain Name和這個Domain Controller的Domain Name到底有什麼差別.Website Domain Name是Internet上使用.而Domain Controller的Domain Name只是在這個Domain使用,你可以使用原本Website Domain Name來當作現在Domain Controller Domain Name, 他們沒有間接關係.為了容易區分,我們還是使用比較特殊如”nspmpg.com” . 按”Next” 繼續.
8.
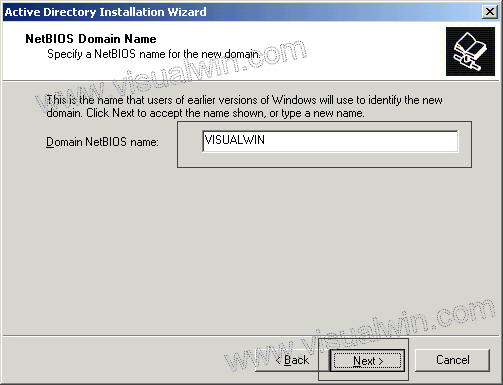
輸入NetBIOS Name, 這個名字是讓Windows 9X,NT4系統認別的名字.為了方便起見﹐我們可以使用”nspmpg”. 按”Next” 繼續.
9.
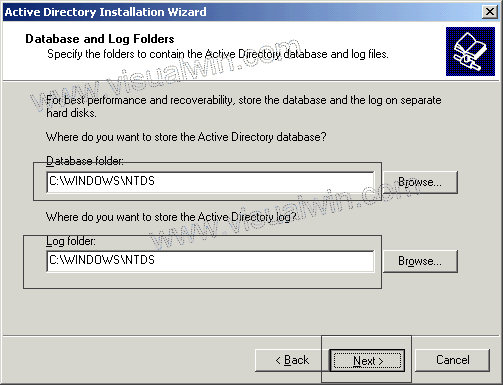
儲存Active Directory Database和Active Directory Log的位置,建議你儲存在另一個硬碟,方便以後回復(Restore)和系統表現也最好.按”Next” 繼續.
10.
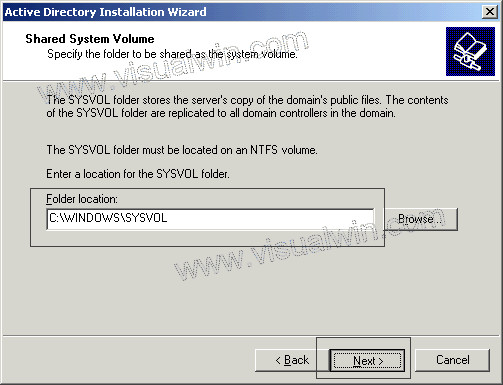
儲存System Volume(SYSVOL) 的位置.按”Next” 繼續.
11.
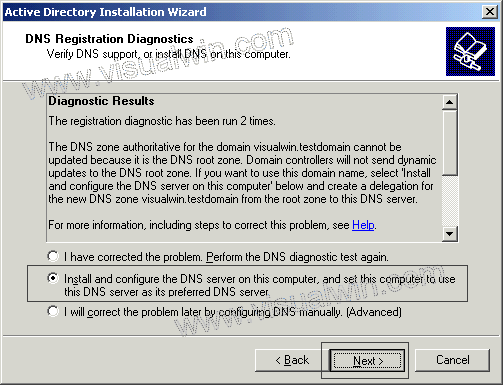
有鑒于本文的說明這是Server第一個Active Directory, 而網絡上沒有DNS Server, 選擇Install and Configure DNS Server on this computer, and set this computer to use this DNS Server as its preferred DNS Server. 按”Next” 繼續.
12.
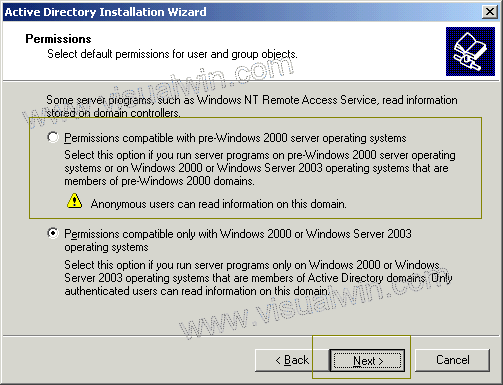
注意:
a) Permission compatible with pre-Windows 2000 server operating systems: 選擇這個如果你的Client Computer有使用Windows 9X/NT4,不單是Windows 2000 or Windows XP, Windows Server 2003都可以使用這個Server的服務.請別忘了注意這個選項,因為如果你沒有選這個,那麼所有的Windows 9X/NT4就沒法登錄(Login).
b) Permission compatible only with Windows 2000 or Windows Server 2003 operating systems: 選擇這個如果你的Client Computer只是Windows 2000或Windows XP或Windows Server 2003系統.
選擇適合你的網絡環境,如果你的Client Computer還是有使用Windows 9X, 選擇a), 如果你的Client Computer是純Windows 2000或更佳,選擇b), 按”Next” 繼續.
13.
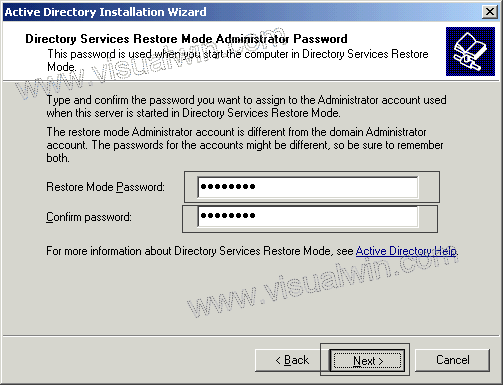
輸入Directory Service Restore Mode Administrator password. 這個密碼只在啟動Directory Services Restore Mode才需要的.
14.
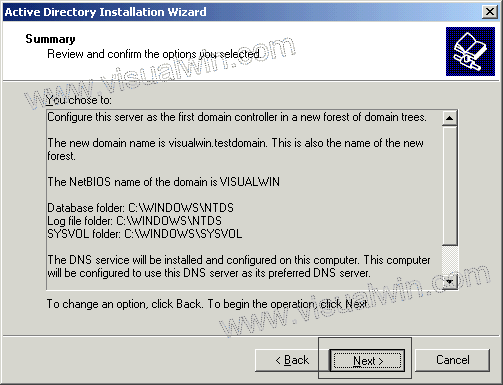
審查所有的設定,當你確定都是正確後,按”Next” 繼續.
15.
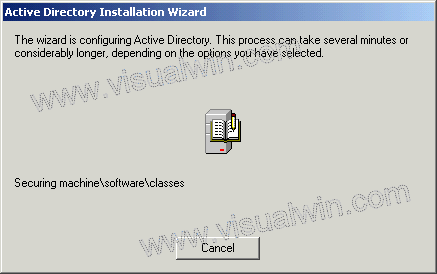
安裝開始進行,系統會進行偵查和安裝各種需要的組件(Components).安裝程式也會詢問你放入Windows Server 2003 Installation CD進行安裝DNS Server.
16.
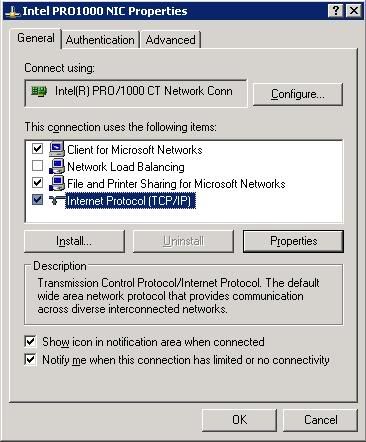
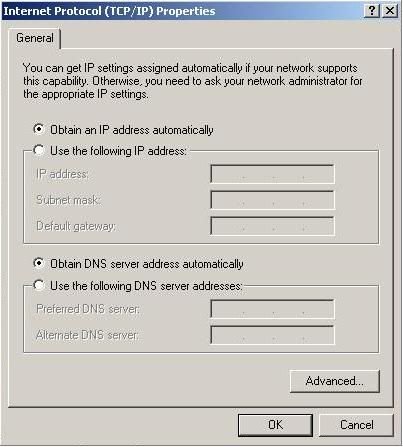
確保Clients for Microsoft Networks, File and Printer Sharing for Microsoft Networks, Internet Protocol(TCP/IP)都有打勾.
Active Directory設定一個Fixed IP Address,如圖下的列子:
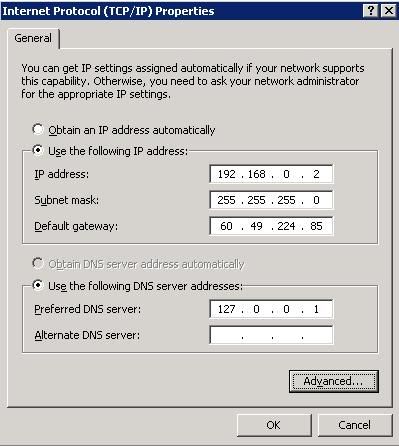
IP Address: 192.168.0.2 <-你必須確保這個IP Address沒有其他的電腦使用.
Subnet Mask: 255.255.255.0
Default Gateway: xxx.xxx.xxx.xxx <-輸入你要的Gateway IP Address
Preferred DNS Server: 127.0.0.1 <-DNS Server IP Address
17.
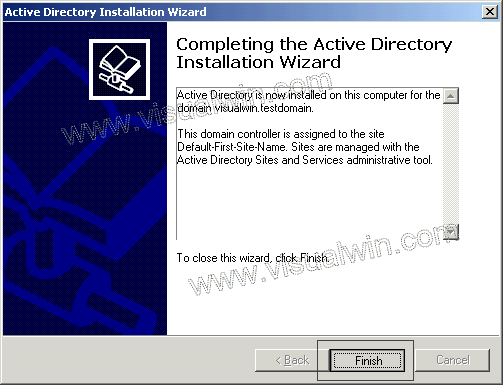
按”Finish” 完成Active Directory的安裝.
什麼是DNS(Domain Name System) Server?
DNS Server是一個Server, 目的是記錄電腦的IP Address和名字.一個電腦的IP Address 是192.168.0.4, 電腦名字是AC02, 那麼如果DNS Server就會記錄這個項目,當Active Directory需要知道什麼是AC02的IP Address時,DNS Server就會通知它. DNS Server也可做相反的工作。
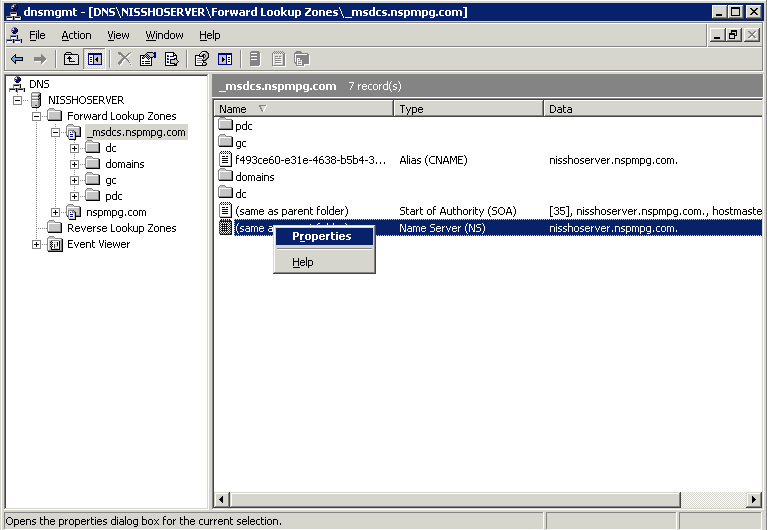
檢查DNS Server的操作狀況:
1. Start -> Administrative Tools -> DNS
2. 參考圖下,選擇Properties.
3.
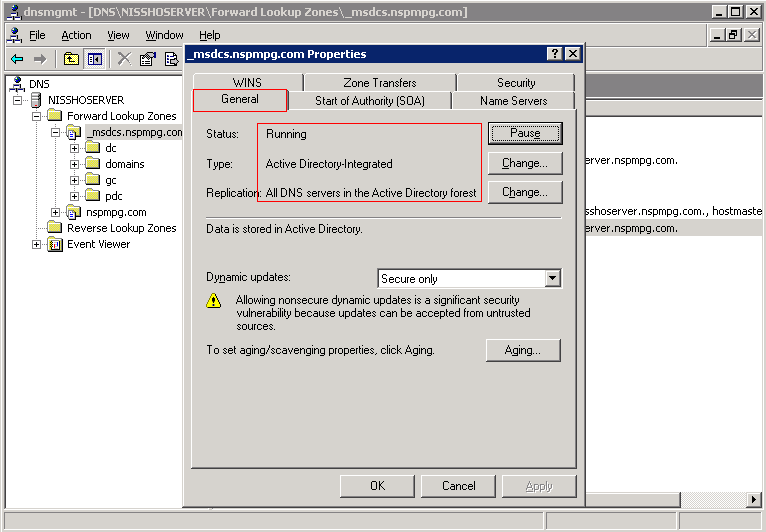
從圖上﹐我們可以看到DNS Server正在執行(Running), 而範圍是在Active Directory.
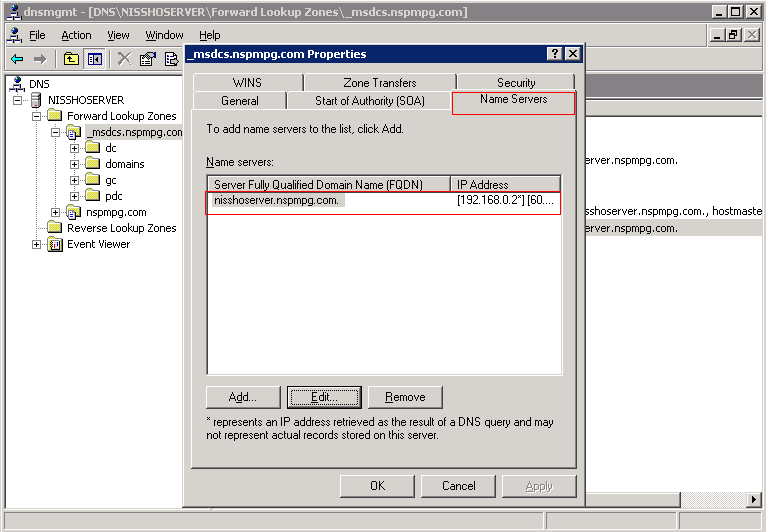
從圖上﹐我們可以看到DNS Server正在使用IP Address: 192.168.0.2
[ 本帖最后由 goolb78 于 19-5-2006 08:44 PM 编辑 ] |
评分
-
查看全部评分
|
|
|
|
|
|
|
|
|
|
|
楼主 |
发表于 16-4-2006 07:21 PM
|
显示全部楼层
第三篇 安裝DHCP(Dynamic Host Configuration Protocol) Server
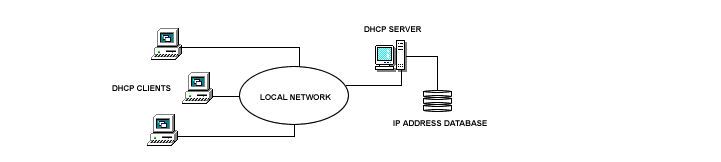
什麼是DHCP? DHCP是一種IP標準﹐其目的是減低IP Address管理的複雜性. 安裝DHCP的目的是設定網絡上的特別設定. 這些特別設定可以包括Gateway, DNS Server, WINS(Windows Internet Name System),Subnet Mask和特別限定的IP Address範圍。
"Dynamic Host Configuration Protocol (DHCP) is an IP standard designed to reduce the complexity of administering IP address configurations." - Microsoft's definition. A DHCP server would be set up with the appropriate settings for a given network. Such settings would include a set of fundamental parameters such as the gateway, DNS, subnet masks, and a range of IP addresses.
通過DHCP, 管理員不需要親自設定每個電腦的IP Address甚至是Gateway IP Address, DNS IP Address 或Router IP Address. DHCP可以自動的分配IP Address給每個DHCP Client(使用DHCP服務的Client Computer).
1. Start -> Manage Your Server
2. Add or remove a role

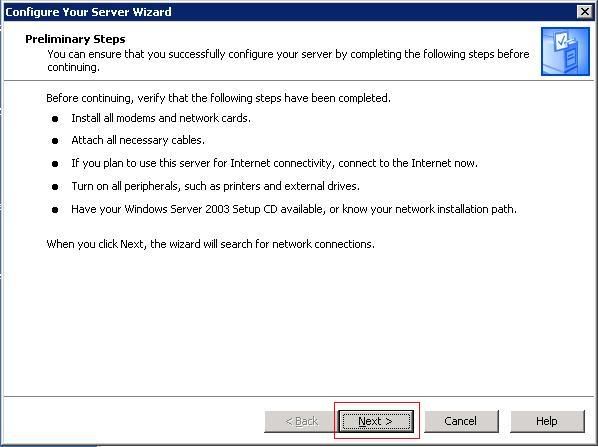
3. 按"Next"
4. 選擇DHCP Server,然後按“Next"繼續.
5.
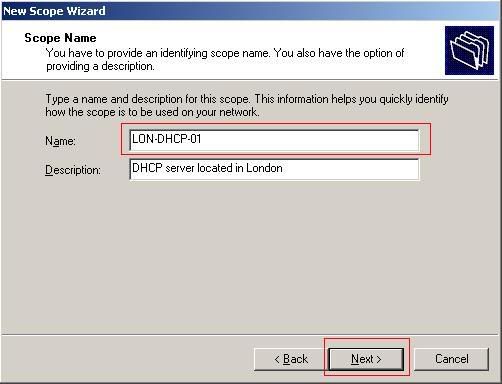
輸入你的Scope名字。Scope是電腦使用DHCP所可以使用的一組IP Addresses. 本文建議輸入Scope1, 然後輸入你要註解(Description)。按“Next” 繼續.
6.
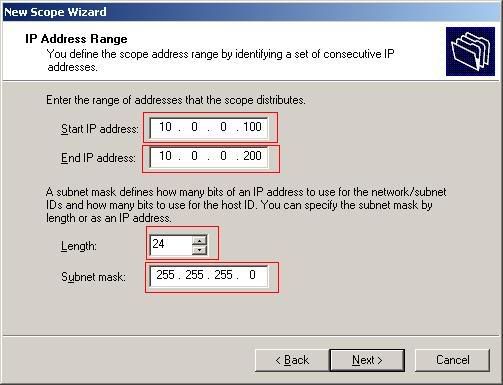
輸入Start IP Address和End IP Address. 列子: 如果你輸入Start IP Address: 192.168.0.10,End IP Address: 192.168.0.254, 那麼DHCP就可以分配245 IP Addresses在這個Scope. 輸入Subnet Mask, 和Length. 建議不要更改Length (筆者本身也不知道其意思是什麼.)
建議值:
Start IP Address: 192.168.0.10
End IP Address: 192.168.0.254
Length: 24
Subnet mask: 255.255.255.0
*筆者保留了192.168.0.1至192.168.0.9為其他Servers的Fixed IP Address. 按“Next” 繼續.
7.
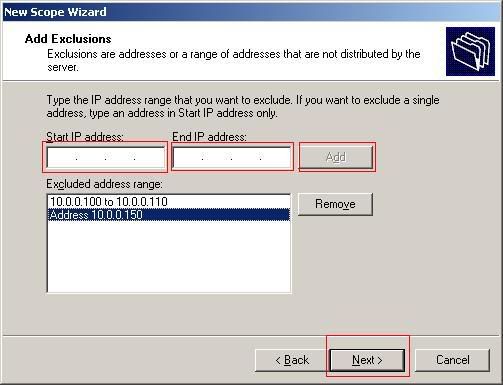
輸入不要被分配的IP Addresses. 輸入Start IP Address和End IP Address , 然後按”Add” 加入.按”Next” 繼續.
筆者的Network Printer使用192.168.0.40, 所以筆者將Start IP Address設定為192.168.0.40, End IP Address為192.168.0.45
8.
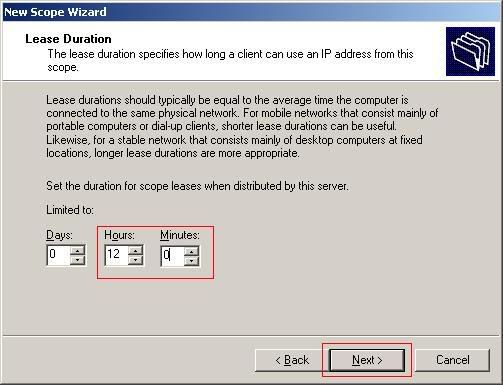
屬于可分配IP Addresses可以使用期限﹕12小時. 按”Next” 繼續.
9.
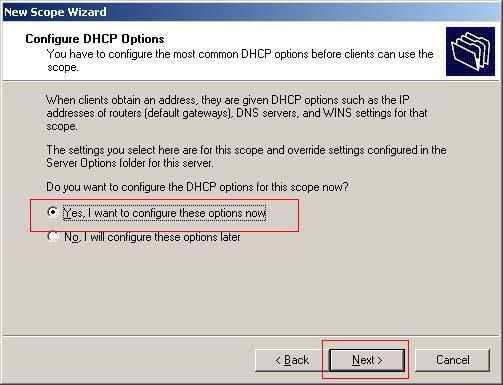
選擇Yes, I want to configure these options now. 按”Next” 繼續.
10.
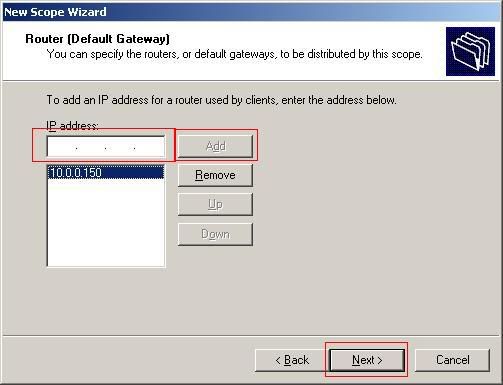
輸入Gateway的IP Address, 你可以輸入多個IP Address. 使用Up或Down來改變其順序. 按”Next” 繼續.
11.
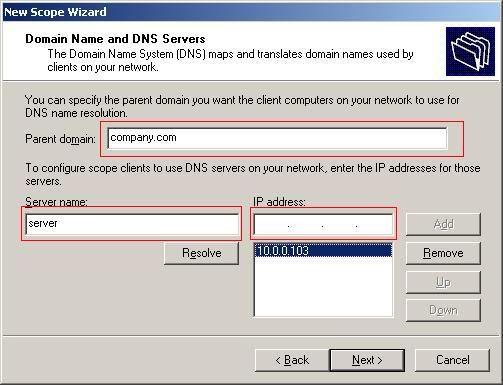
輸入Domain名稱,DNS Server名字,和DNS Server IP Address. 按”Next” 繼續.
Domain Name: nspmpg.com
DNS Server Name: nisshoserver
DNS Server IP: 192.168.0.2
12.

輸入WINS Server名字和IP Address. 按”Next” 繼續.
13.
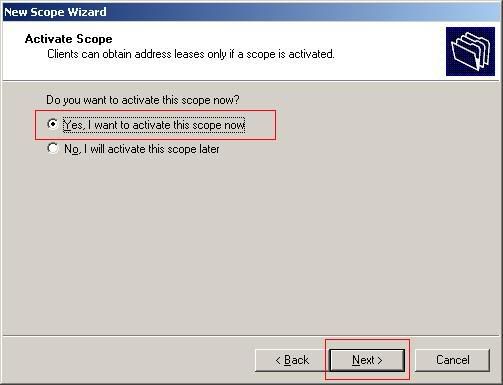
是否要馬上使用這個scope? 選擇Yes, I want to activate this scope now, 然後. 按”Next” 繼續.
檢查DHCP Server狀況
1. Start -> Administrative Tools-> DHCP
2.
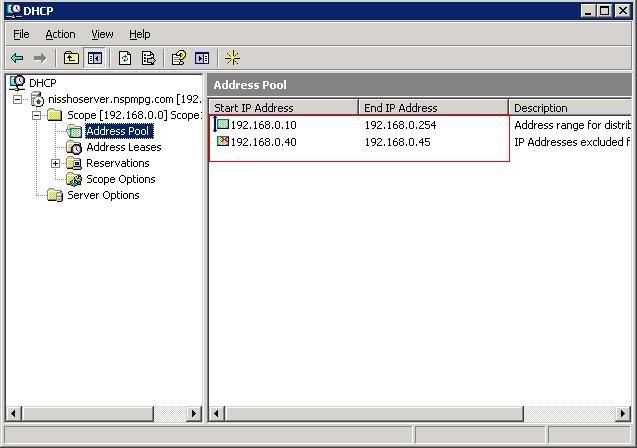
Address Pool顯示現有可分配的IP Addresses和不被分配的IP Addresses.
3.
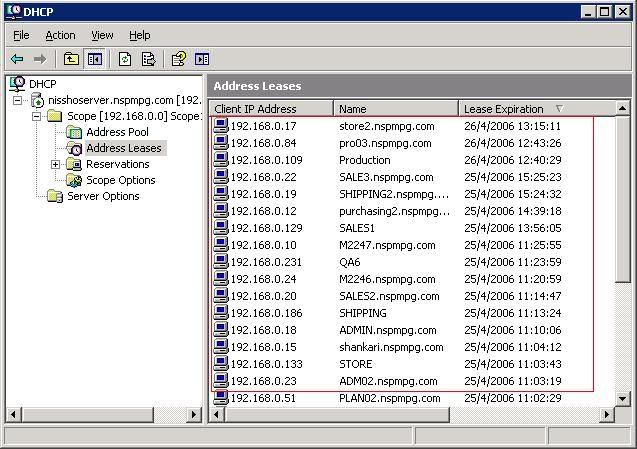
Address Leases顯示現在被分配的IP Address的電腦名稱和期限
4.

Scope Option顯示自動識別其他Server的IP Address, 這些都自動分配給Client自動默認.
設定Windows 98 SE Client Computer使用DHCP Server
設定Windows ME Client Computer使用DHCP Server
設定Windows 2000 Professional/Server Client Computer使用DHCP Server
設定Windows XP Professional Client Computer使用DHCP Server
[ 本帖最后由 goolb78 于 19-5-2006 07:46 AM 编辑 ] |
|
|
|
|
|
|
|
|
|
|
|
楼主 |
发表于 14-5-2006 07:46 AM
|
显示全部楼层
第四篇: 使用Active Directory
Active Directory是屬於Managed Desktop Environment的管理方式(Manage method),通過使用Group Policy Object(GPO), 可以統一地(Unify),簡易地(Simplify),有效率地(Effectively), 管理所有Active Directory里的使用者(Users),電腦(Computers),系統設定(system settings),系統安全設定(system security settings)和其他的設定(other settings)。
在還沒有使用Active Directory前﹐我們必須要了解一些特別名字(Terms):-
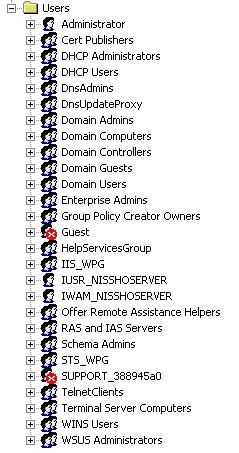
1.Root: 這是Active Directory的主要目錄﹐它包含了所有的organizational units, built-in accounts, computers, foreign security principles 和users.
2.Organizational Unit: 是Active Directory組成部份. 我們可以通過公司的Organizational Chart里取得這些資料﹐將Active Directory也設定成公司的Organizational Chart一樣﹐方便通過使用GPO來管理使用者的電腦. 在Orgnizational Units裡面﹐我們可以增添﹐編輯和刪除新的使用者(User)。

3.built-in accounts: 內建的特別account, 方便歸納在某種使用者群(User group)
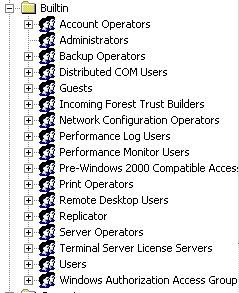
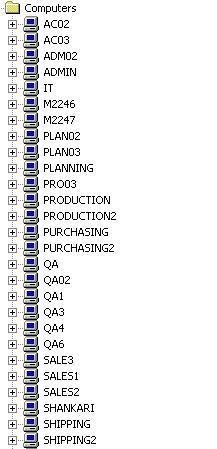
4.computers: 所有Active Directory里使用的電腦
5.foregn security principles: 筆者還不知道如何使用這個功能.
6.users: 標準的使用者列子.
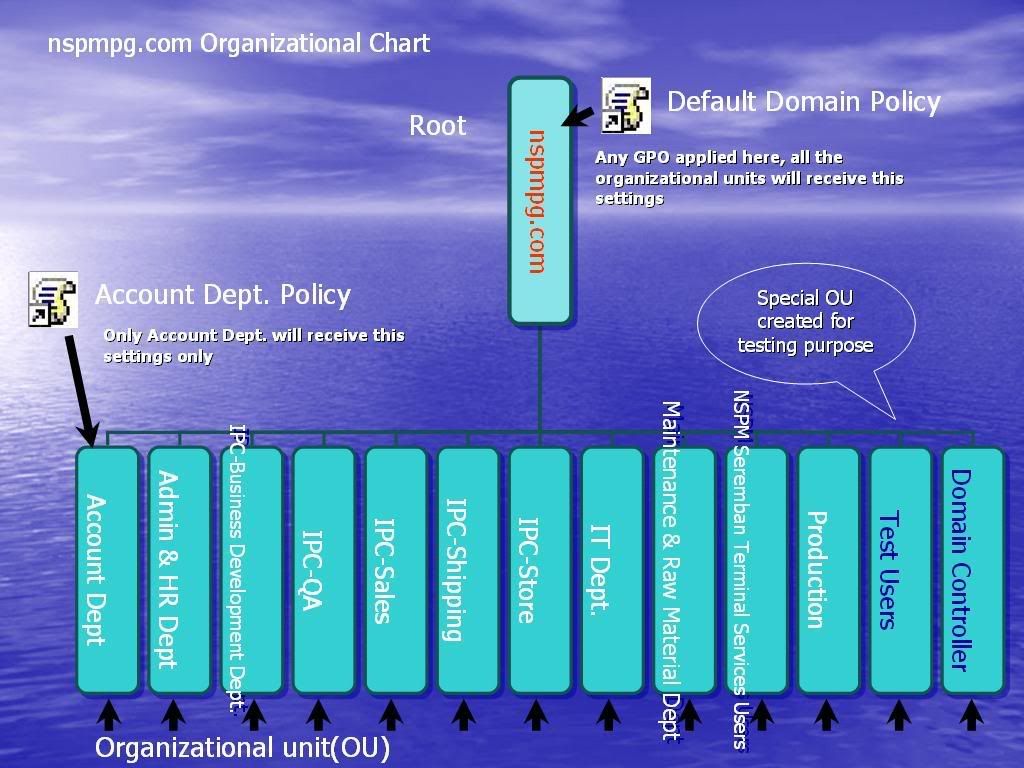
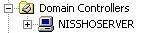
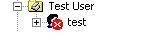
明白了基本名字意思之後﹐我們來看看圖表. 通過圖表,我們可以看到nspmpg.com就是Root. 它包含了所有的orgnaizational units(OU). 而這些OUs都是屬於nspmpg.com的. 藍色的字標(Domain Controller) 是標準內建OU, 我們不需要去新增或編輯它,它在安裝Active Directoryl的過程中已經自動的建立在內.
所有的OUs都是有關部門(Department)的名稱﹐Test Users是特別的OUs, 那是筆者自己手動建立的,目的是測試新使用者賬號(User account).
從這個Organizational Chart, 我們可以一目了然地知道所有OUs的構造。然後我們可以根據使用者屬於什麼部門﹐將他們加入相關的OU裡面。OU裡面是包含所有屬於該性質的Users. 舉個列子﹐User A如果加入Account Dept OU﹐那麼如果你編輯Account Dept Policy GPO並將它連接(Link)在Account Dept OU, 它的設定將影響所有Account Dept. OU里的所有使用者電腦(User computer).
什麼是Group Policy Object(GPO)?
GPO是一群的系統設定(collection of system settings),使用GPO必須要有Active Directory, 我們可以通過編輯(Edit)設定,然後將之連接在特別的OU或Root,已達到管理使用者的系統設定.
當使用者開始登錄(Logon)入Active Directory, Active Directory會檢查使用者的名字和密碼,通過驗證 (Authentication),檢查使用者的OU,後然後將有關的GPO使用在使用者電腦,使用者沒有權限(Permission)去拒絕這些設定,這些設定都是自動化的。
列子
Default Domain Policy是基本和標準的GPO﹐它在Active Directory設立後﹐就自動加入Root, 並管理所有加入Active Directory的電腦﹐包括使用者電腦﹐甚至Domain Controller本身。

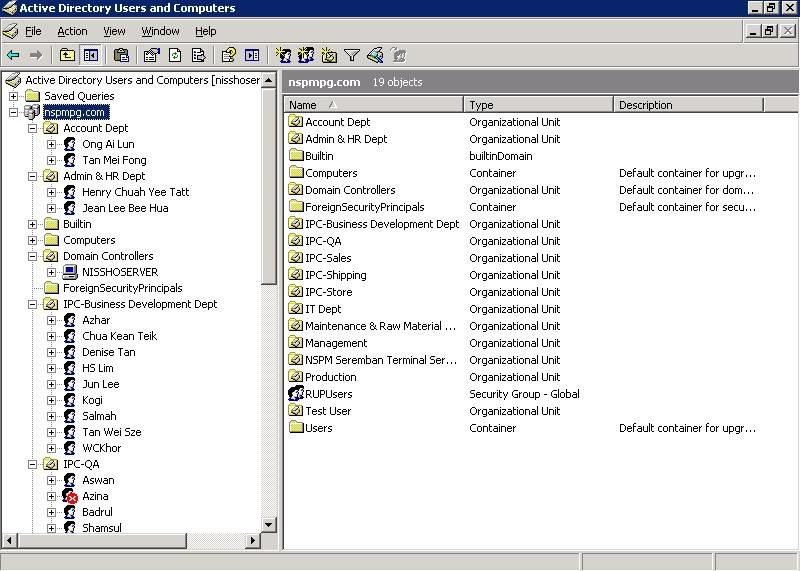
使用Active Directory Users and Computers
Start -> Administrative Tools -> Active Directory Users and Computers
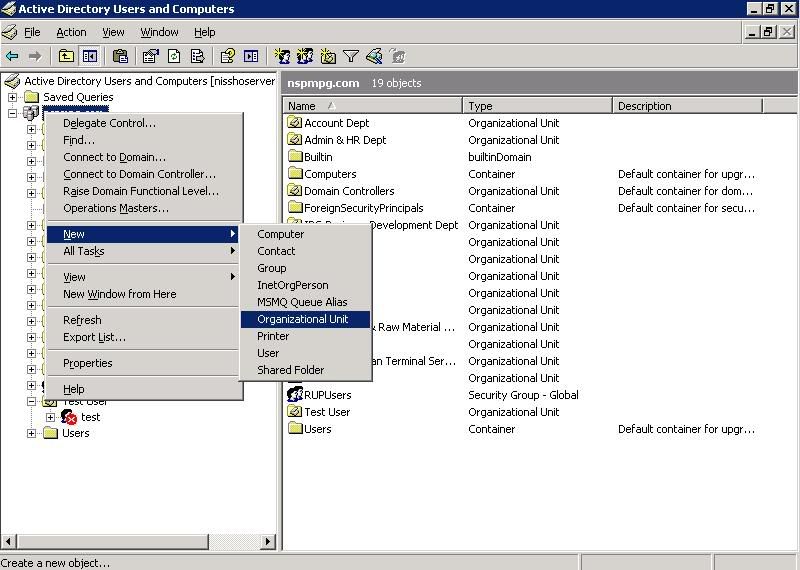
A.建立新的Organizational Unit
1. 右擊nspmpg.com-> New -> Organizational Unit
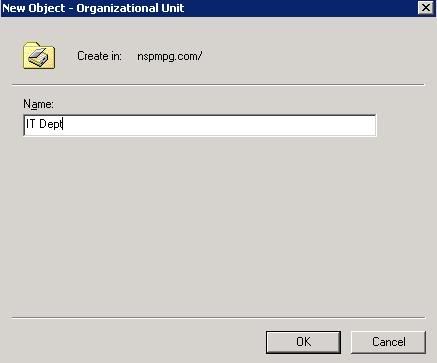
2.輸入Organizational Unit的名字,然後按OK.
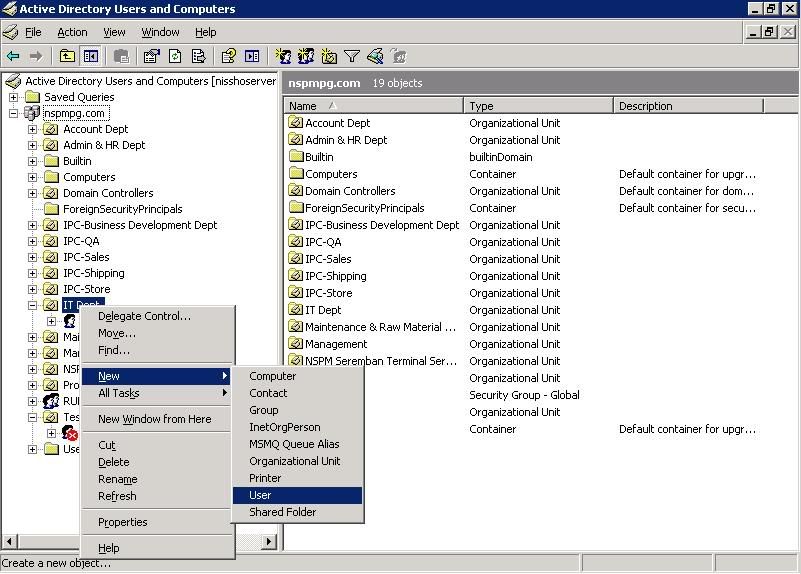
B.建立新的User
1. 右擊要建立User的Organization Unit -> New -> User
2.
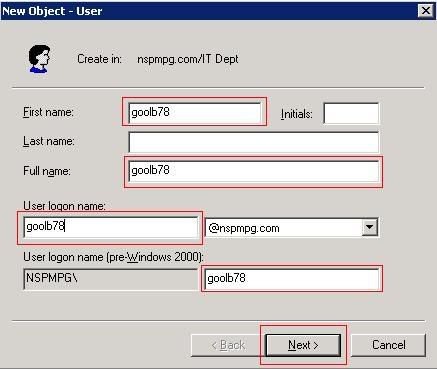
First Name: 輸入前名
Last Name:輸入後名
Initial:輸入昵稱
Full Name:輸入全名
User Logon Name:這個使用者名字是在Windows 2000/XP里使用的。
User Logon Name(pre-Windows 2000):這個使用者名字是在Windows 9X/NT4使用的。
*建議你使用同樣的使用者名稱,這方便使用者在不同版本的Windows登錄入Active Directory
3.
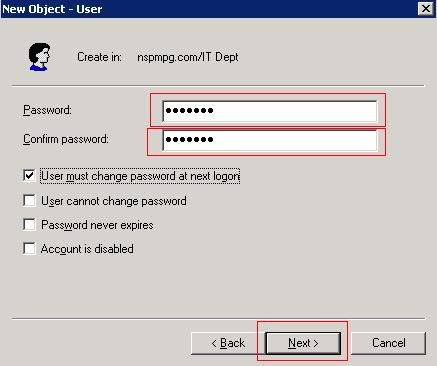
Password:輸入使用者登錄密碼(Logon Password)
Confirm password:再次輸入使用者登錄密碼
選擇(Option):
User must change password at next logon:使用者必須在下次登錄時更改密碼
User cannot change password:使用者不可以更改密碼
Password never expires:使用者密碼永遠有效,不會過期
Account is disabled:這個賬號暫停使用
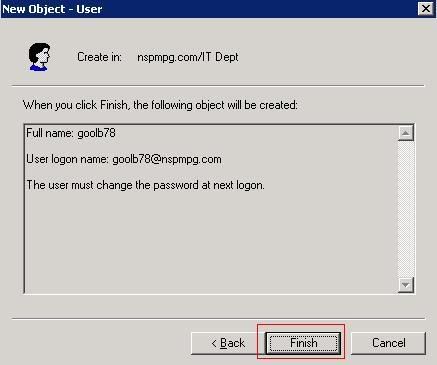
4.按Finish儲存使用者的資料。
5.如果你的密碼不是使用Strong Password,那麼你就會看到這個錯誤信息(error message)
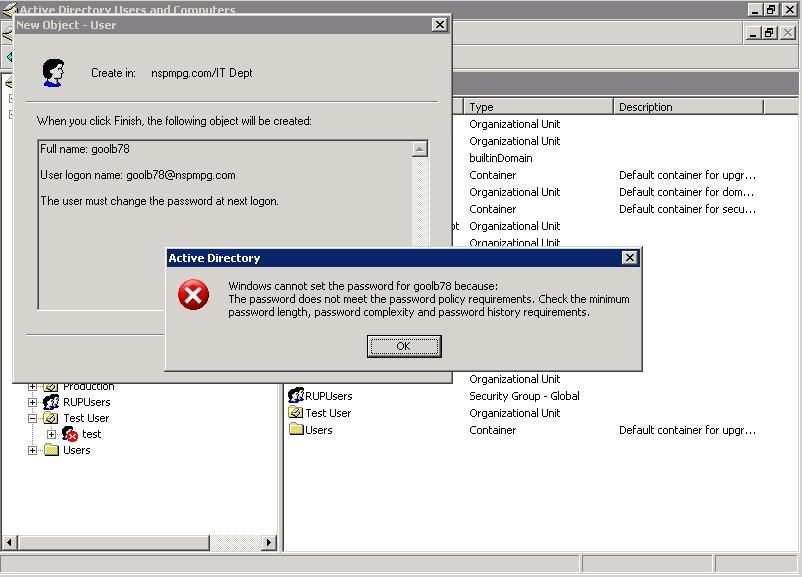
Strong Password is password which must consist of at least 8 alphanumerics characters and it is combination of characters(capital or small capital), numbers, and special character such as @, !, ? between them.It must not be easy to be guess,cannot contains your name and your organizational name.
Weak Password is password which contains the username, organization name, department name and easy to remember and hack.
*關於Strong Password和Weak Password詳情, 請參與Help and Support,輸入Strong Password字眼,就會有詳細的解說。
Valid strong password:
nspm@pg010 (valid because character and number and between them is @, it is 10 characters)
NsPm@PG010 (valid although capital letters)
Invalid strong password:
nspmpg010(doesn't have special character between them)
nspm@1 (the length is not fulfill strong password requirement)
nspmpgsbn@ (don't have numberic character inside)
C.建立新的Computer
1.右擊Computer ->New-> Computer
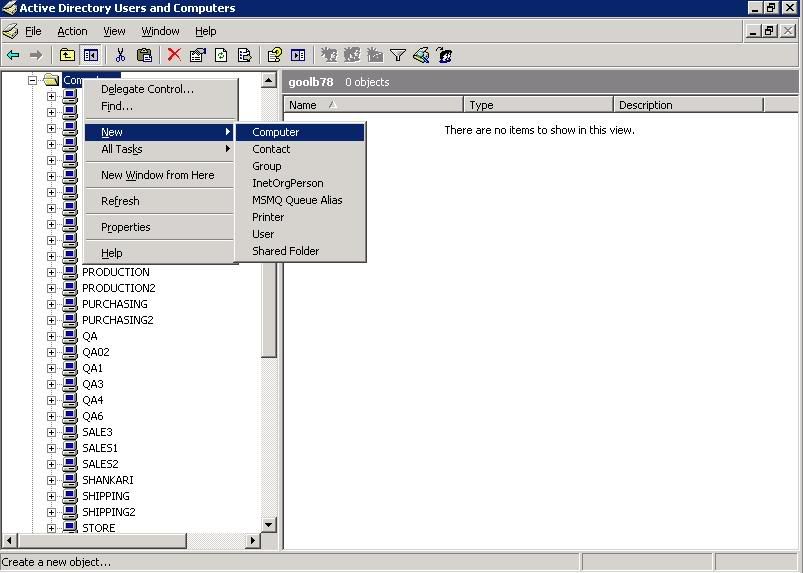
2.
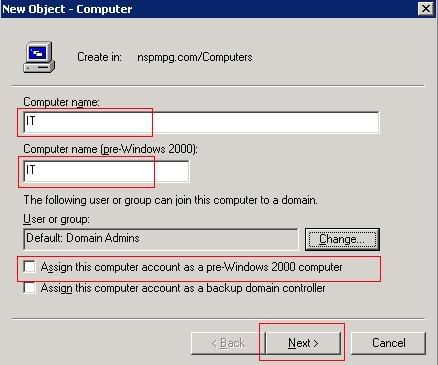
Computer name:輸入使用者電腦名稱(Network ID)
Computer name (pre-Windows 2000):輸入使用者電腦名稱(Network ID),如果該電腦是Windows 9X/NT4
請將Assign this computer account as a pre-Windows 2000 computer打勾,如果使用者電腦是屬于Windows 9X/NT4.Windows 2000/XP電腦不需要將之打勾。接著按Next繼續。
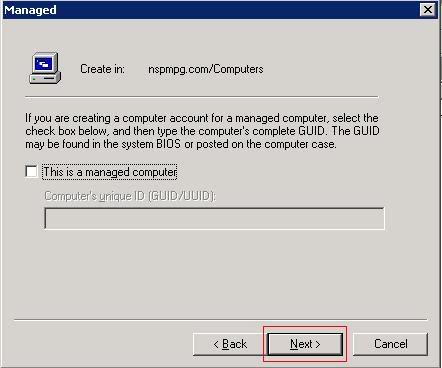
3.按Next繼續
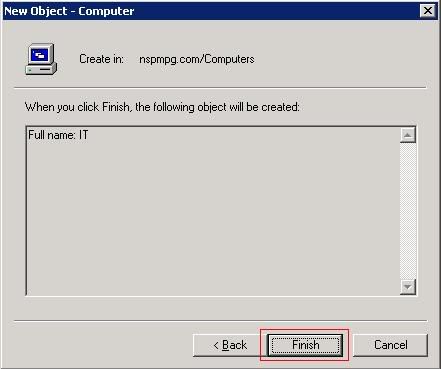
4.按Finish繼續
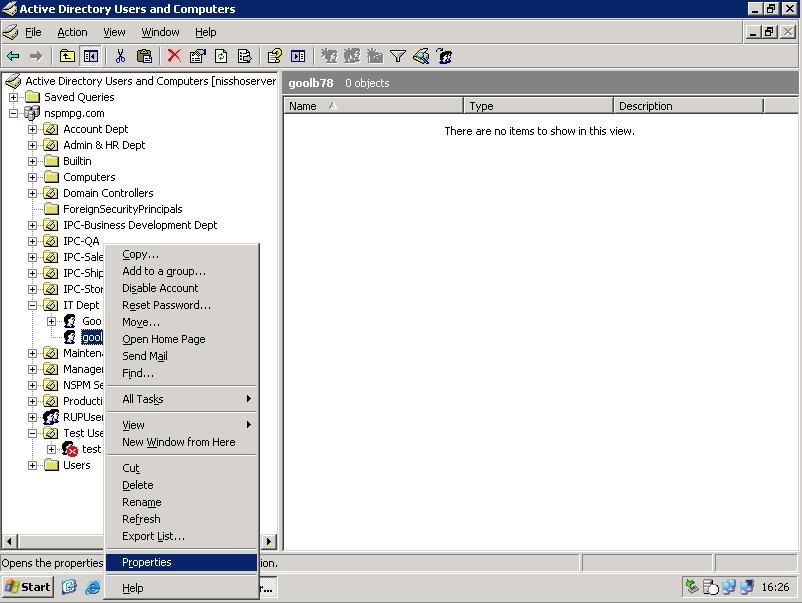
D.編輯使用者賬號(User Account)
1.到相關的OU,右擊使用者名字,然後選擇Properties
2. 使用者賬號是有很多設定可以編輯,如圖下,看起來很複雜,其實只要注意有使用到的部份就可,一般上重要的部份就如以下的解說:-
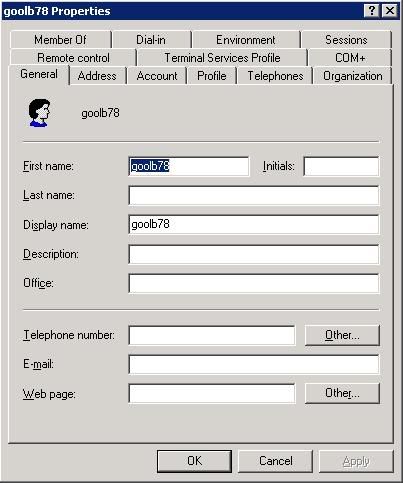
General:使用者的基本資料
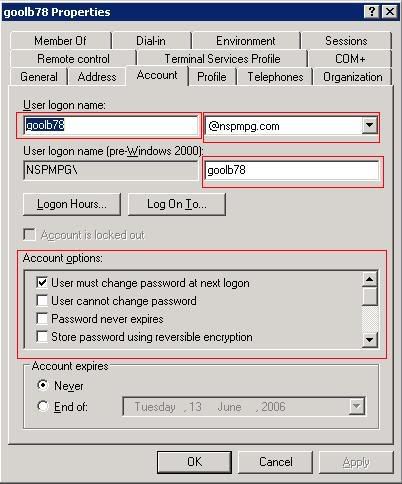
Account:賬號的資料和設定,可以編輯關於賬號相關的設定
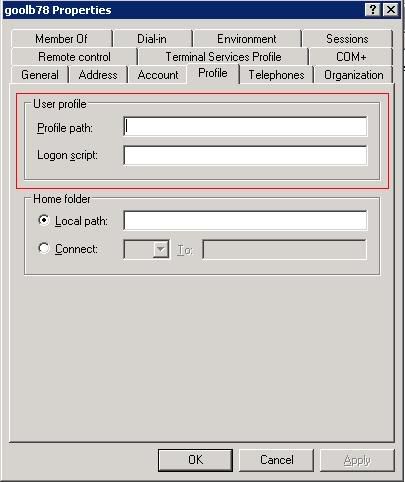
Profile:User profile的儲存位置﹐如果你是使用Roaming User Profile,你必須輸入Network path,如果是Local user profile那麼這個部份是空的。
Roaming User Profile(RUP): An user profile stored in server,available and applied to that computer when user is logon to that computer, with RUP, user settings remain constant although user logon to different computer. This is applied for Windows 2000/XP computer only.
Local User Profile(LUP): An user profile stored on the computer where user used to logon, this profile cannot be duplicated to another computer in the network. When user logon using another computer, a new user profile is created on that computer. User settings is lost when user logon on to different computer.
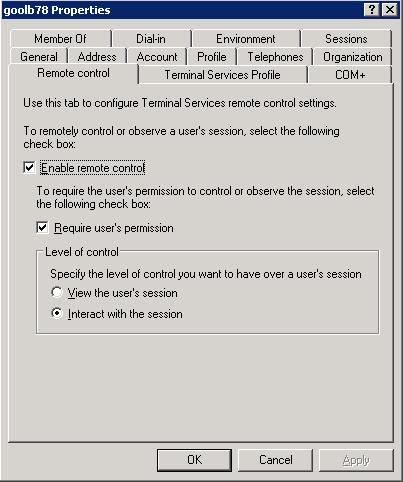
Remote Control:使用Remote Control,如果使用者登錄Terminal Server來控制使用者的電腦.
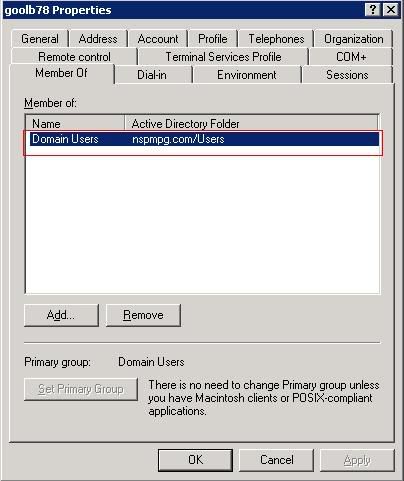
Member of:使用者屬于的會員,普通使用者都是Domain users.你可以加入使用者使用其他權限如Domain Administrator.
使用者賬號(User Account)管理選項:
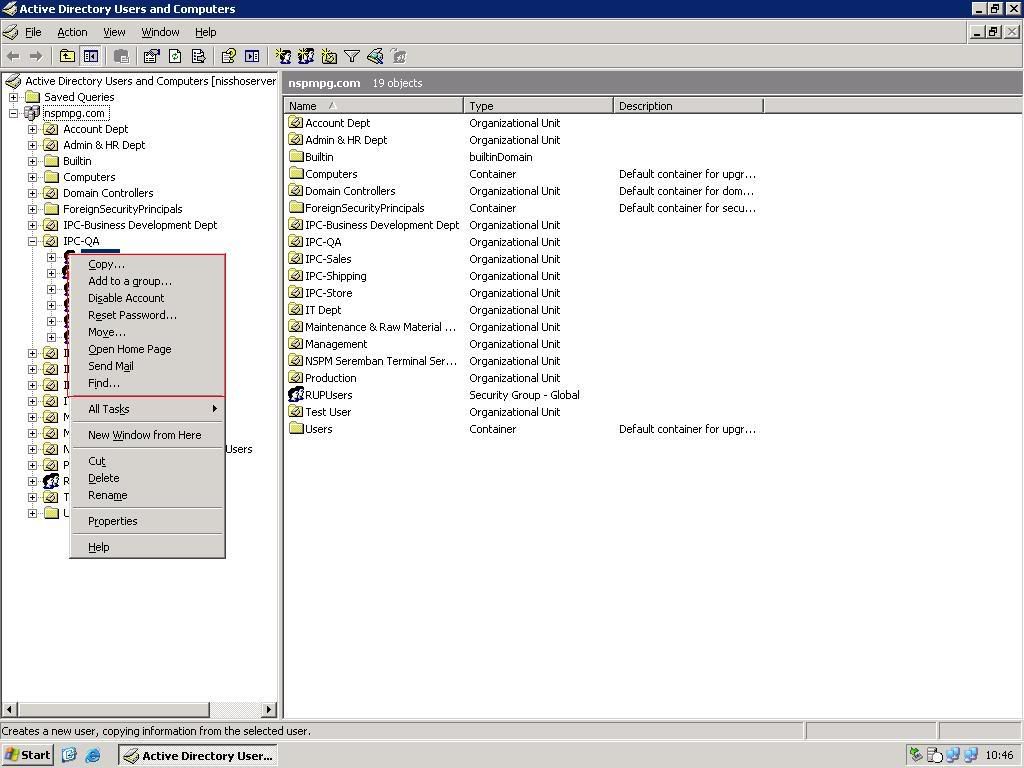
Copy:將這個使用者拷貝至其他OU
Add to a group:將這個使用者放在其他使用者群(User Group)
Disable Account:將這個使用者設定為無法使用
Reset Password:重新為使用者輸入新的密碼
Move:將該使用者轉移至其他OU
Open Home Page:打開使用者的Home Page
Send Mail:發E-mail給這個使用者
Find:尋找特定使用者
[ 本帖最后由 goolb78 于 19-5-2006 08:55 PM 编辑 ] |
|
|
|
|
|
|
|
|
|
|
|
楼主 |
发表于 18-5-2006 11:50 PM
|
显示全部楼层
第五篇 設定Client Computer登錄Active Directory和共享文件(Shared Documents)
A. 使用Windows XP Client Computer加入Active Directory
1. Start -> Control Panel -> System -> Computer Name
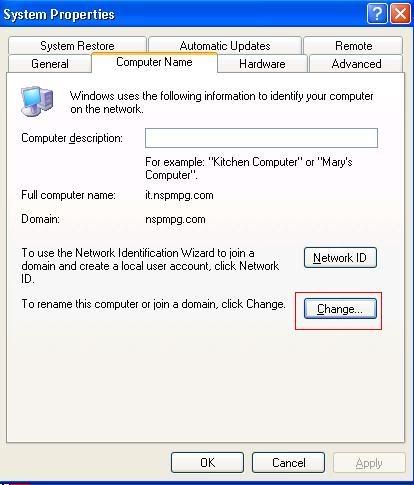
2. 按Change繼續
3.
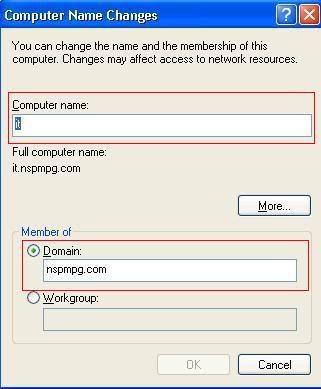
Computer Name: 輸入你要加入Active Directory里的電腦名字,這個已經在Active Directory Users and Computer輸入。
Member of Domain:輸入Domain Controller的名字,在本文里,nspmpg.com是Domain Controller的名字.
按OK繼續。
4.這部電腦開始向Domain Controller進行登記和驗證,Domain Controller會要求輸入使用者名字和密碼,如圖下,輸入該使用者名字和密碼
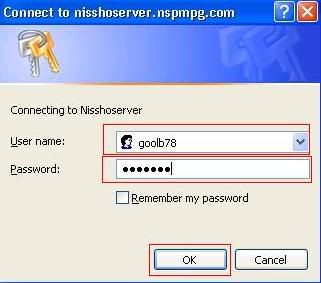
5.Domain Controller會驗證使用者和密碼﹐如果成功的話﹐系統會要求使用者重新啟動電腦.請重新啟動電腦。
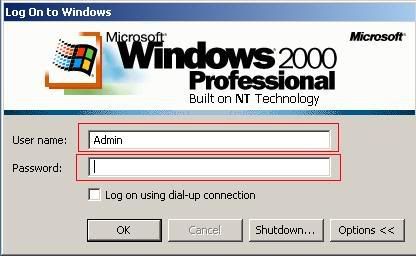
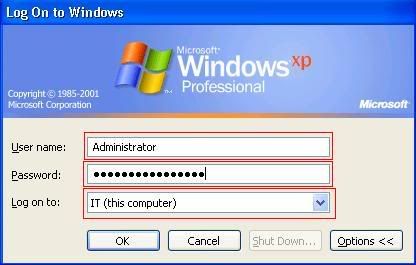
6.當使用者啟動電腦後,Client Computer登錄方式有了變化﹐使用者需要按Alt+Ctrl+Delete來進行登錄,使用者需要輸入使用者名字和密碼來登錄Active Directory如圖下
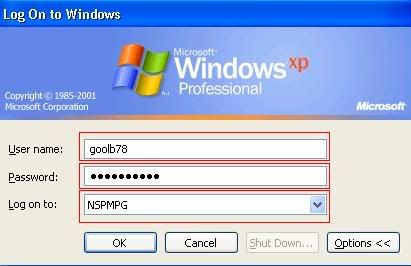
7.由於是新的Domain user,系統會自動使用新的Local User Profile來儲存新的使用者資料﹐每個使用者都是獲得一模一樣的新的Local User Profile.
*此篇也更新在我的另一作品:
Windows XP系统安装步骤及指南:http://chinese.cari.com.my/myfor ... 3Ddigest&page=2
B. 使用Windows 2000 Client Computer登錄Active Directory
1. Start -> Control Panel -> System -> Network Identification tab
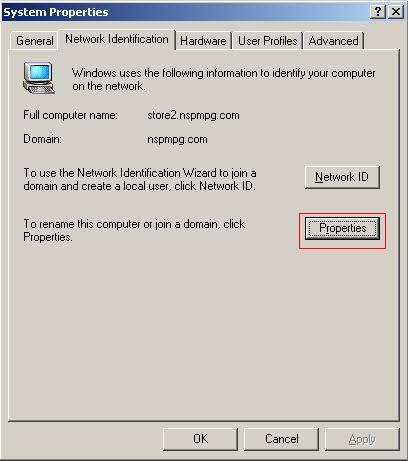
2. 按Properties繼續
3.
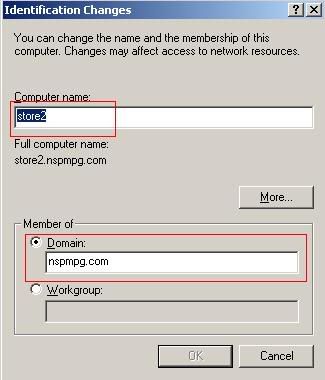
Computer Name: 輸入你要加入Active Directory里的電腦名字,這個已經在Active Directory Users and Computer輸入。
Member of Domain:輸入Domain Controller的名字,在本文里,nspmpg.com是Domain Controller的名字.
按OK繼續。
4.這部電腦開始向Domain Controller進行登記和驗證,Domain Controller會要求輸入使用者名字和密碼,如圖下,輸入該使用者名字和密碼
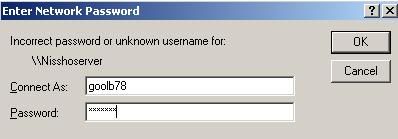
5.Domain Controller會驗證使用者和密碼﹐如果成功的話﹐系統會要求使用者重新啟動電腦.請重新啟動電腦。
6.當使用者啟動電腦後,Client Computer登錄方式有了變化﹐使用者需要按Alt+Ctrl+Delete來進行登錄,使用者需要輸入使用者名字和密碼來登錄Active Directory如圖下
7.和Windows XP一樣,由於是新的Domain user,系統會自動使用新的Local User Profile來儲存新的使用者資料,每個使用者都是獲得一模一樣的新的Local User Profile.
*此篇也更新在我的另一作品:
Windows 2000系统安装步骤及指南:http://chinese.cari.com.my/myfor ... p;extra=#pid3557956
C. 使用Windows 98SE/ME Client Computer登錄Active Directory
1.請記得安裝Active Directory Client Extension(DSClient),因為這樣Windows 98SE/ME電腦才能支援加入Active Directory.
2.右擊Network Neighborhood,選擇Properties
3.Identification tab: Change the Workgroup -> NSPMPG
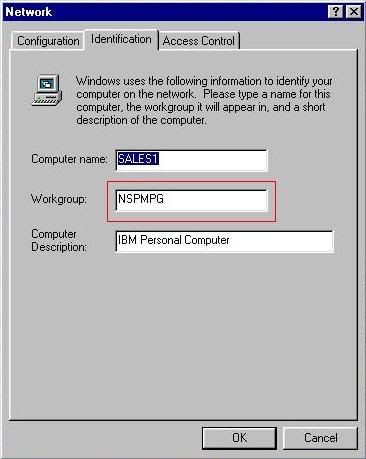
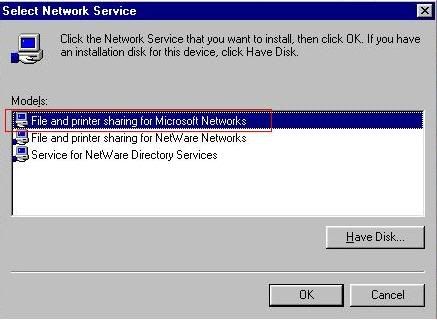
4.Configuration tab: Add -> Service -> File and Printer Sharing for Microsoft Networks
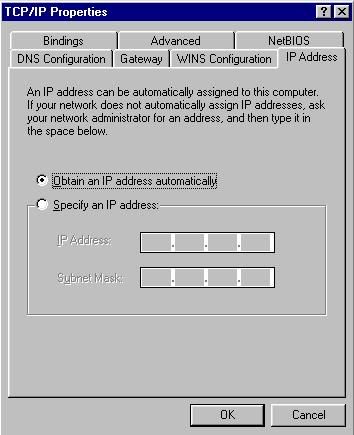
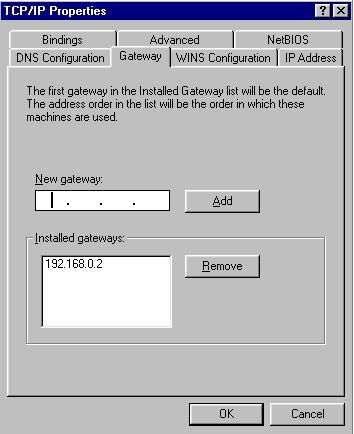
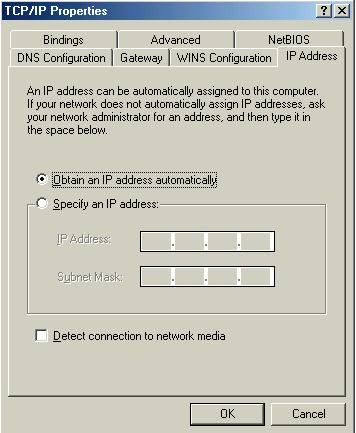
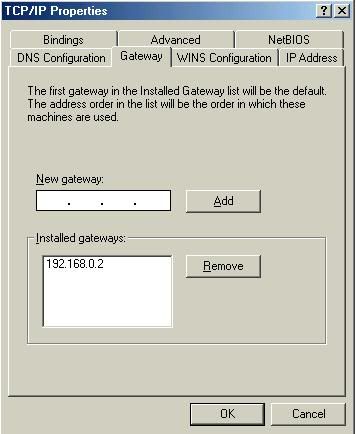
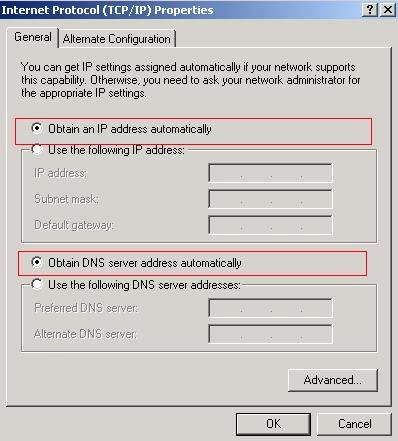
5.雙擊TCP/IP and 更改一下的設定:-
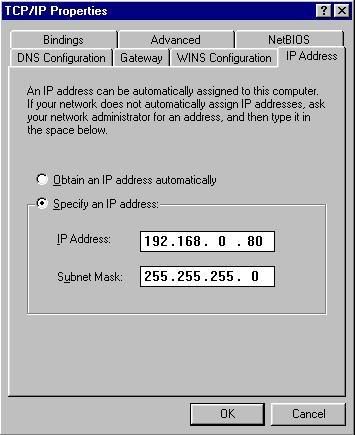
如果你需要設定固定IP Address(Fixed IP),可以編輯,你也可以使用DHCP Server自動取得IP Address.
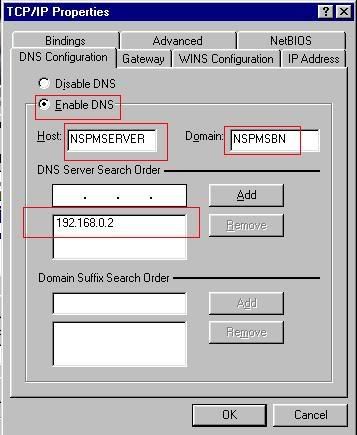
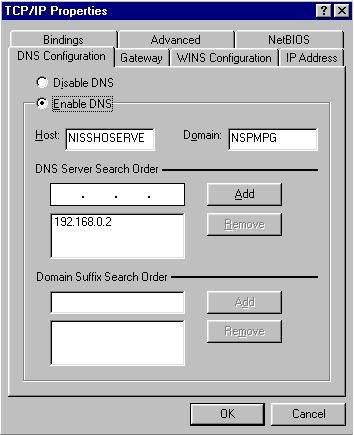
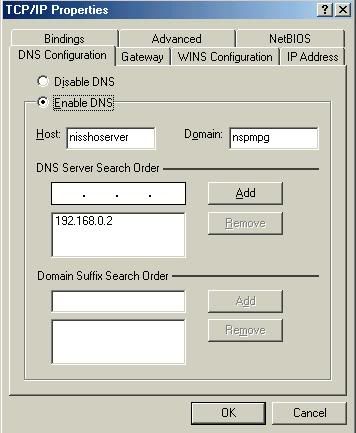
設定使用DNS Server,這個部份不可出錯,不然的話,Windows 98 SE/ME不能加入Active Directory
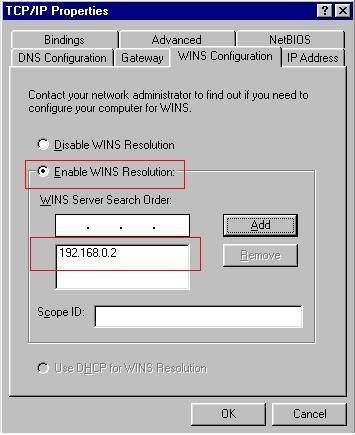
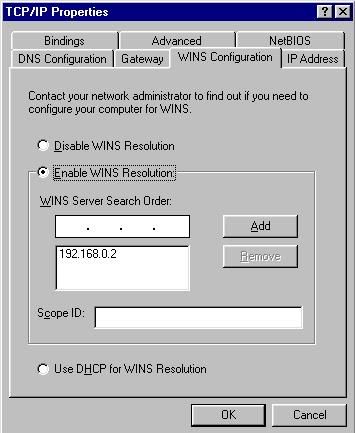
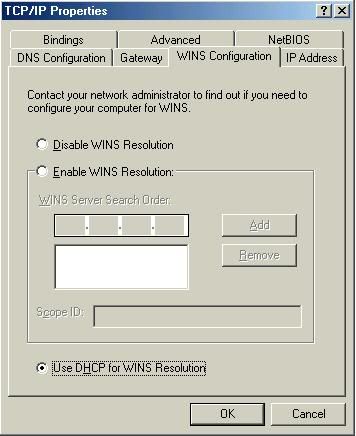
設定使用WINS Server(Windows Internet Name System)如果需要
6.
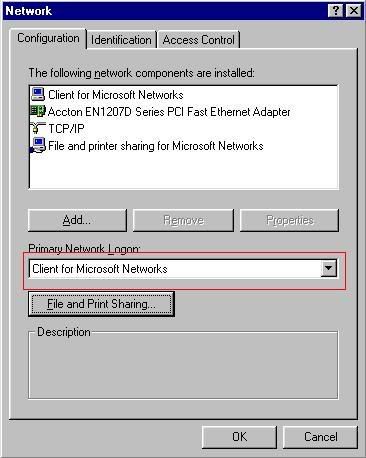
Primary Network Logon:選擇Client for Microsoft Network
7.重新啟動電腦,輸入使用者名字和密碼.選擇加入正確的Domain.那麼就成功加入Active Directory.
*此篇也更新在~WoW~的作品:
win98从无到有安装过程+Format 过程:http://chinese.cari.com.my/myfor ... Ddigest#pid14833520
注意事項:
1. Windows XP系統:如果使用者已經在還沒登錄Active Directory前使用了電腦和並存有很多資料,當使用者登錄Active Directory後,所有的資料不能自動的轉換至新的Profile.你可以在原本的User Profile使用Files & Settings Transfer Wizard來備份(Backup),然後在新的Domain User Profile使用恢復(Restore). Windows 2000也是如此,但是它沒有Files & Settings Transfer Wizard,你必須手動的轉移使用者資料.
2. 關閉Client Computer的Local Administrator Account或者使用Strong Password防止使用者使用Administrator來改變Client Computer設定或安裝軟體.使用者使用的Domain User Profile是屬於限制型的User Profile(Limited User Profile),他們不可以更改重要系統設定如安裝軟體,更改系統安全設定和增減硬體.
3. Windows 98SE/ME Client Computer不能支援Default Domain Policy和GPO,所以所有的資料不需要轉移.
*Domain User Profile is created when user logon to Active Directory at the first time which can be roaming or local depend on User Profile settings. The profile is constrained by the Default Domain Policy and other GPO that applied to it.It contains the user settings and user data such as My Documents
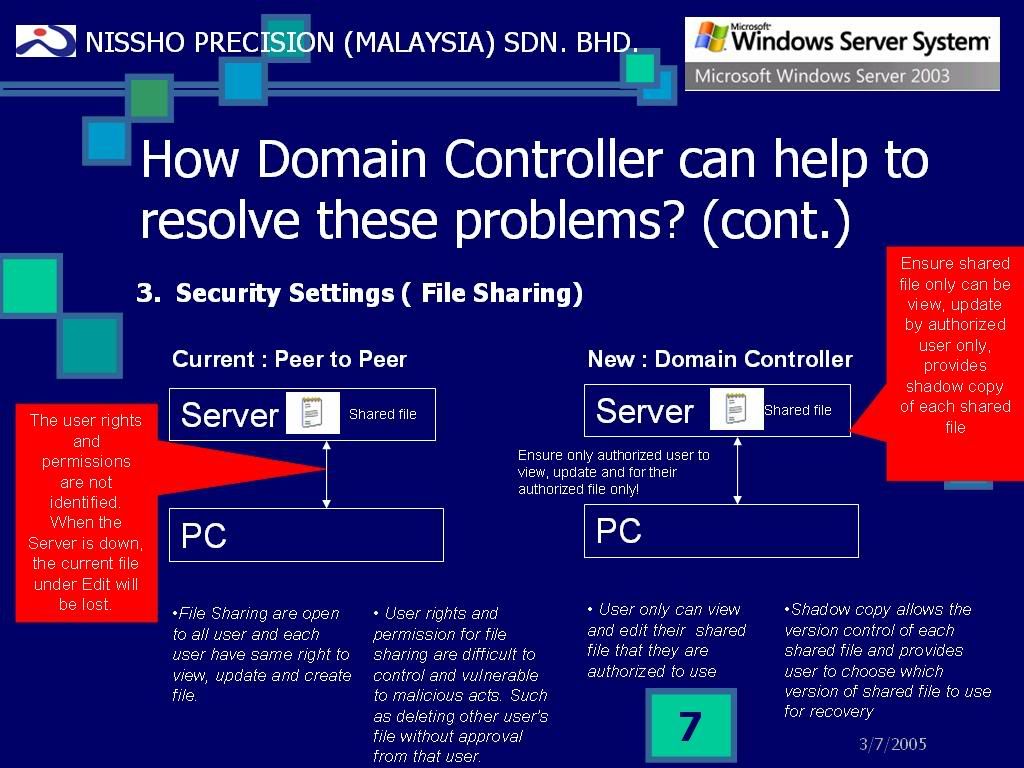
共享文件(Shared Documents)
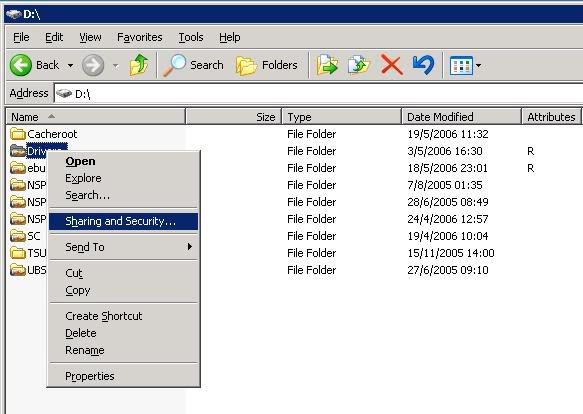
1.右擊你要共享的文件夾(Folder),選擇Sharing and Security
2. 輸入共享名字(Share Name),開始編輯使用者的權限(Permissions).

3. 全部(Everyone)是原本的設定,你可以編輯全部使用者對這個文件夾可以使用的權限.
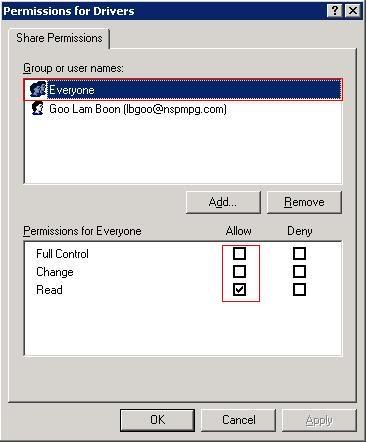
Full Control:使用者可以進行任何文件操作如rename,copy,delete和edit
Change:使用者只可以更改文件內容,不可以delete
Read:使用者只可以讀取這個文件夾,不能delete,copy,rename,edit.
4. 你也可以編輯不同使用者對這個文件夾的權限.
5. Security部份, 系統會檢查使用者是否有權(Eligible)和驗證使用者的權限(Posses proper user rights)

*如果Security裡面沒有編輯好使用者資料,那麼你是不能使用有關的文件夾.
共享文件(Shared Documents)好處
1.管理員(Administrator)可以編輯統一和安全的共享文件,限定使用者的權限和驗證.
2.將所有的網絡的文件都集中在Server里來共享,這樣提高資料的穩定度和方便備份(Backup).
3.防止外來者或惡意行為發生,不同的特定的權限可以防止沒有通過驗證的使用者讀取或更改機密資料.
[ 本帖最后由 goolb78 于 19-5-2006 12:13 PM 编辑 ] |
|
|
|
|
|
|
|
|
|
|
|
楼主 |
发表于 18-5-2006 11:51 PM
|
显示全部楼层
第六篇 使用GPMC來編輯GPO
Group Policy Management Console(GPMC)是用來編輯(edit)Group Policy Object(GPO),連接(link)至相關的OU或Root,讓所有登錄Active Directory的Windows 2000/XP Client Computer或使用者都接收統一地(unified)和標準地(standardized)的設定.通過GPO,我們可以確保使用者系統都是良好的管理(well managed),避免重要系統設定被篡改(modified),以達到Security Policy的要求.
A. 啟動Group Policy Management
Start -> Administrative Tools -> Group Policy Management
* 你需要下載和安裝GPMC,標準的Windows Server 2003是沒有內建這個軟體.
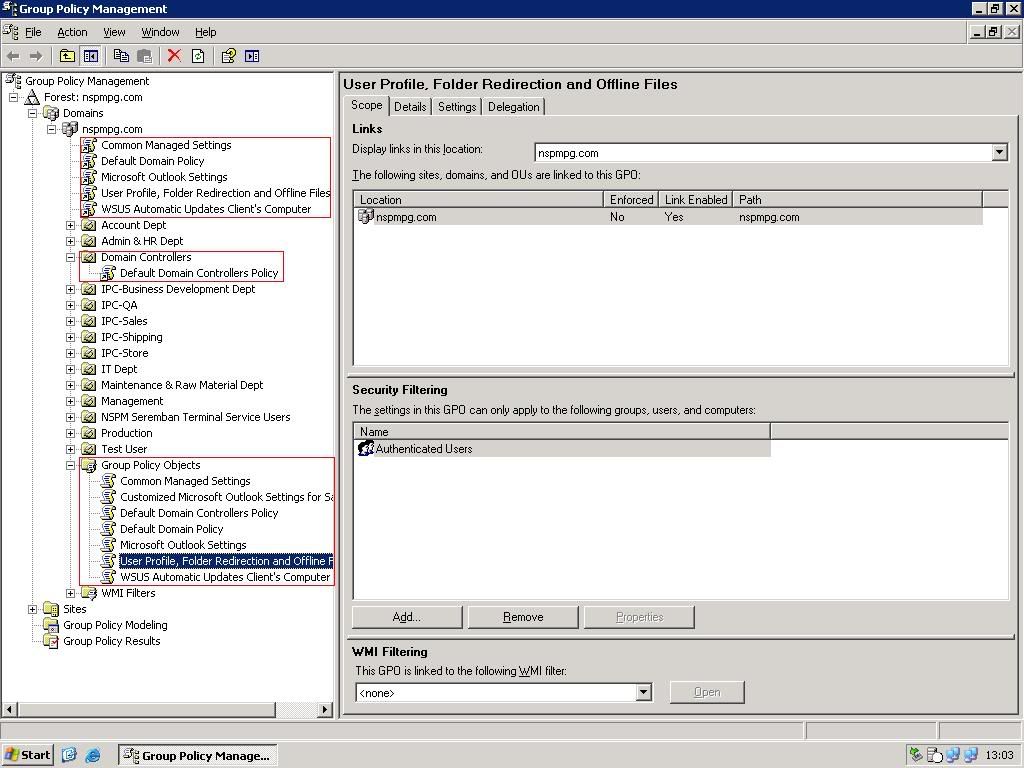
圖上顯示已經連接的GPO(linked GPO),Default Domain Controller GPO和系統所有的GPO.
1. Linked GPO是已經連接至Root或OU的GPO.Client Computer接受GPO裡的所有設定.
當GPO連接至Root時,所有Root裡面的OU, Computers, Users都受影響.如果你只是將GPO連接至特定的OU,那麼只有那個OU裡的使用者才受影響.每當使用者登錄Active Directory,Server會檢查該使用者是屬於那種OU,然後將有關的GPO傳送至Client Computer更改其系統設定.有鑒于此,我們要儘量避免過多的GPO,因為這將造成登錄時間(Logon Time)比較長久,間接影響使用者的工作效率和耐心.
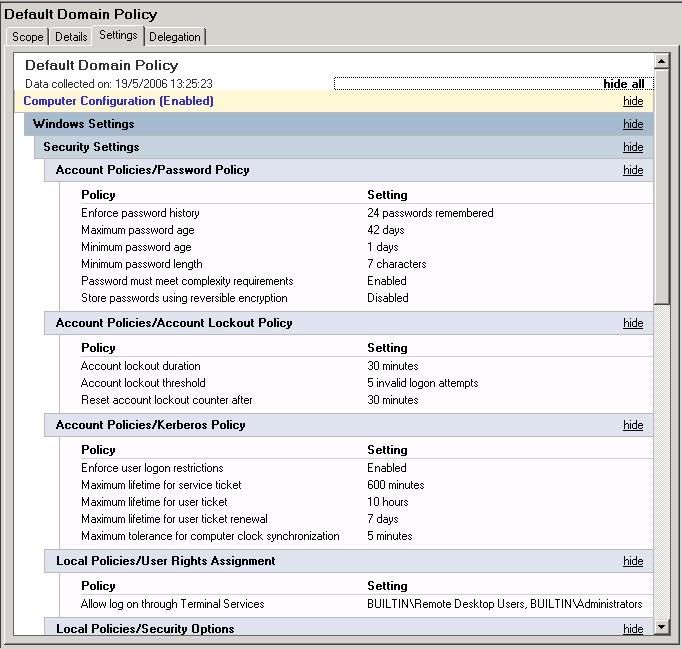
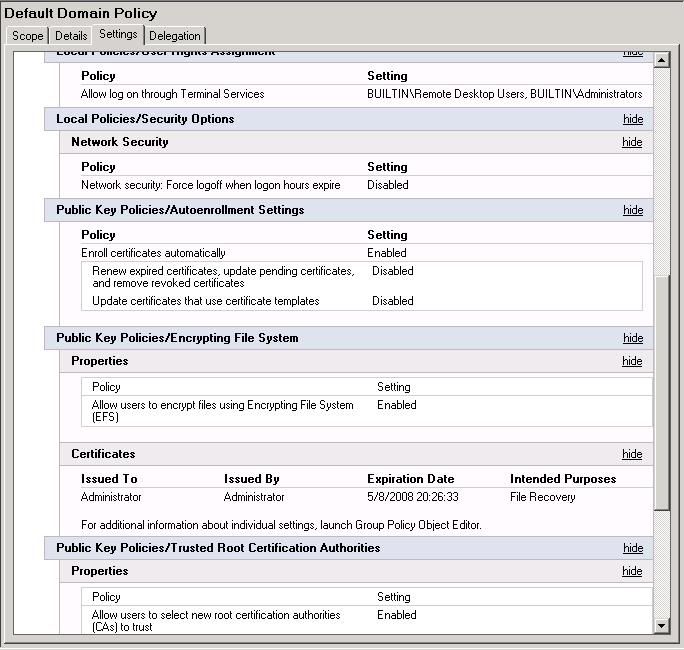
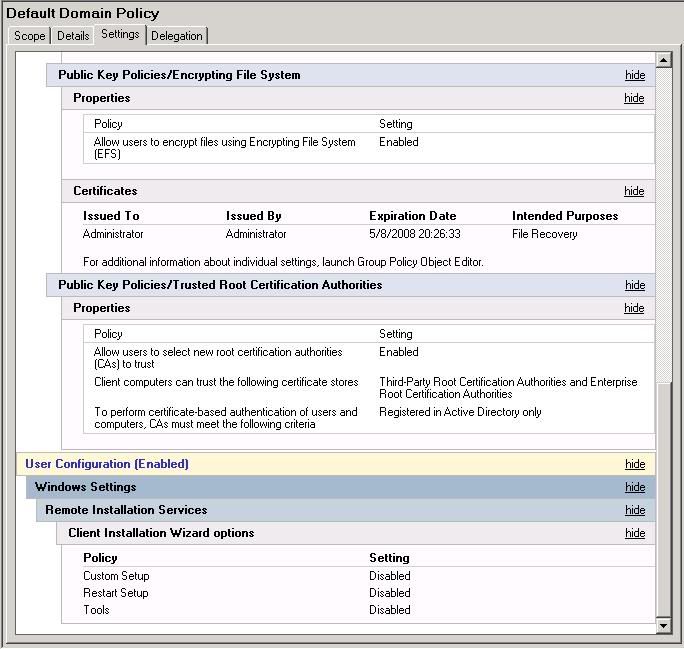
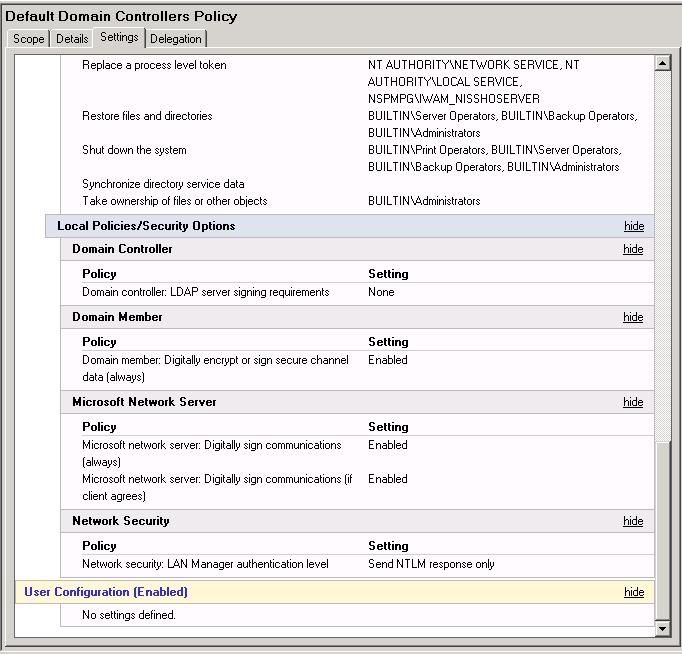
Default Domain Policy是第一個開始使用的GPO,它包含了標準和必要的設定.
第1頁
第2頁
第3頁
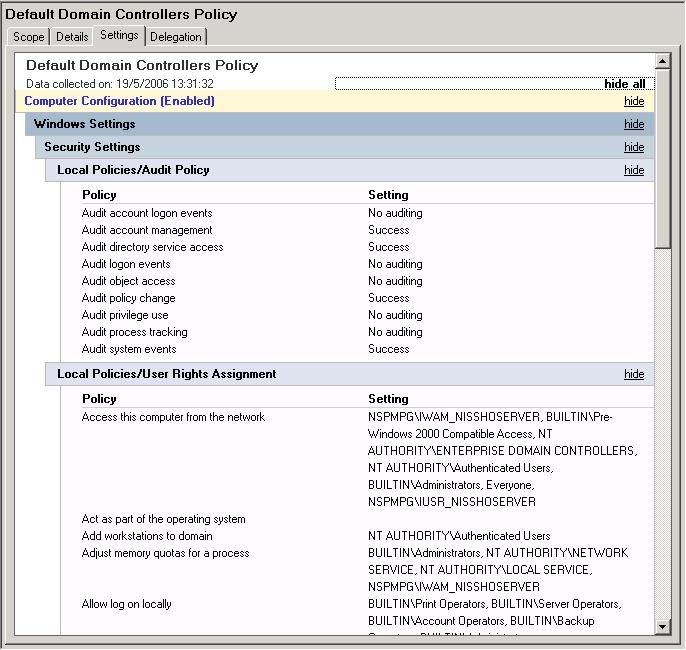
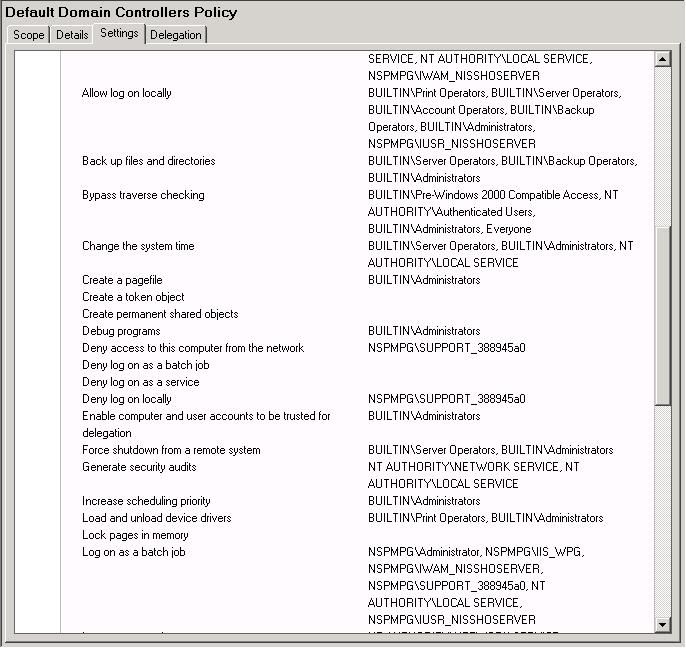
2. Default Domain Controller GPO只是在Domain Controller裡使用.
第1頁
第2頁
第3頁
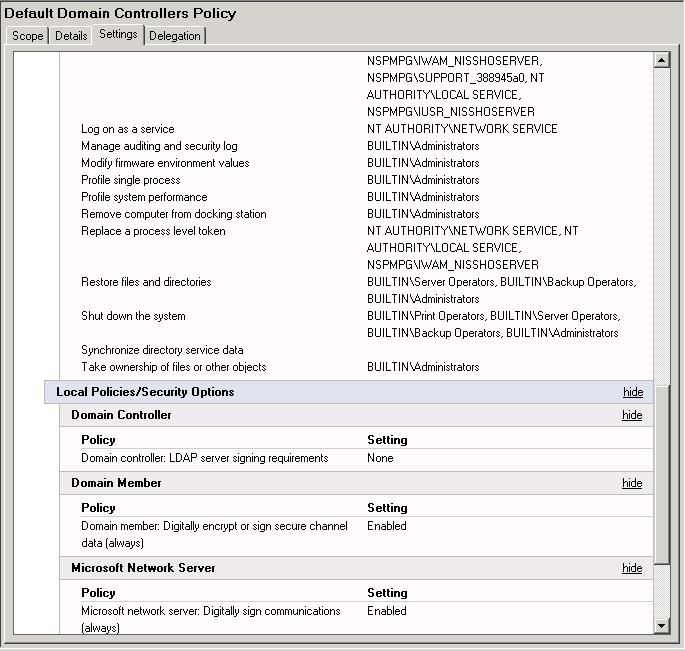
第4頁
3. 系統GPO是系統所有的GPO.它包括還沒有連接(unlinked)的GPO.當我們建立新的GPO時,系統會將它儲存在這裡.
B.建立新的GPO
1.右擊Group Policy Object-> New
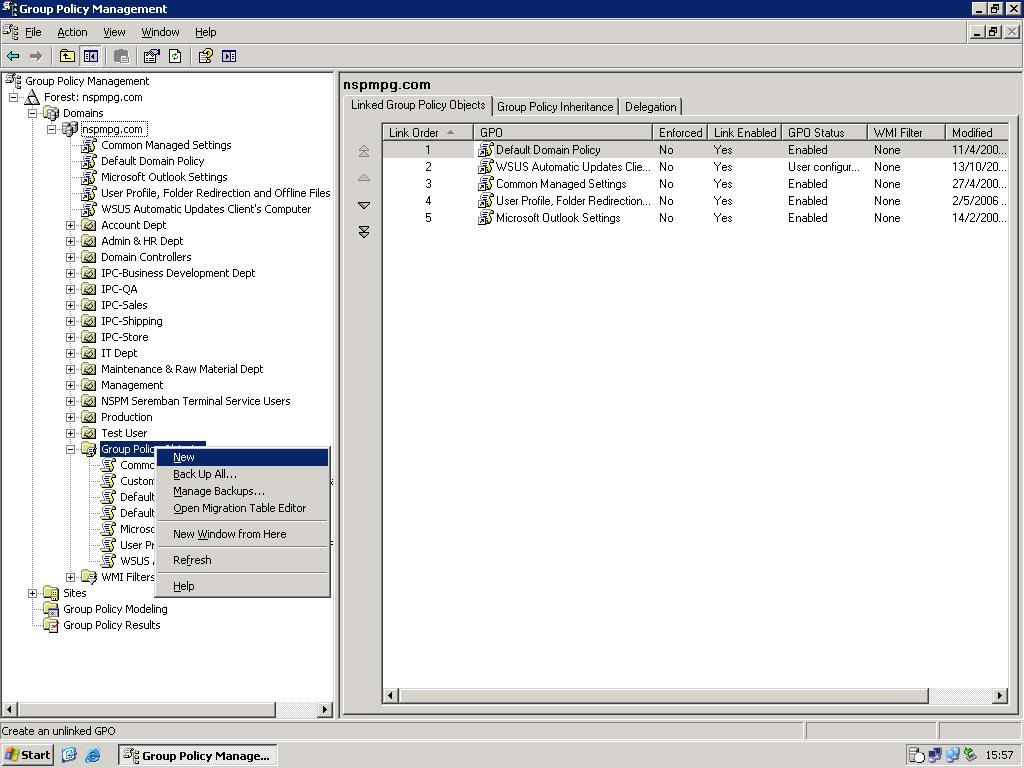
2.輸入GPO的名字.
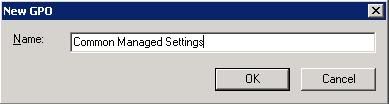
*為了方便以後審查和編輯﹐請不要編輯Default Domain Policy和Default Domain Controller Policy
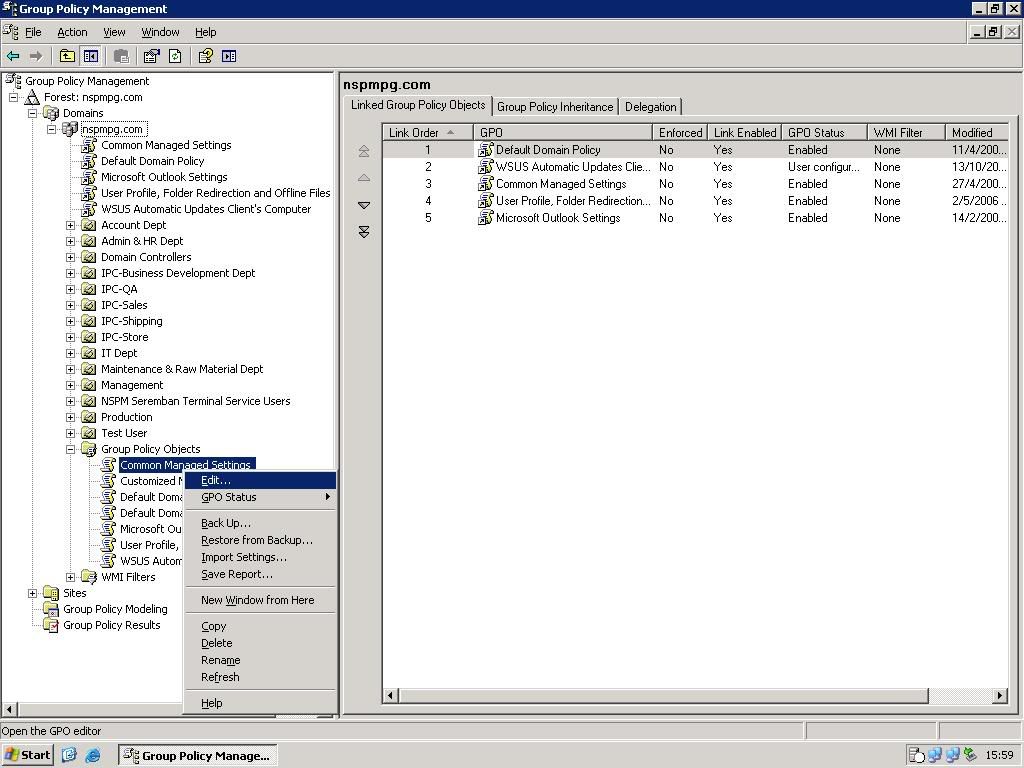
C.編輯GPO
1. 右擊GPO的名字,然後選擇Edit
2.尋找要更改的設定,GPMC會告訴你這個設定適用在作業系統類型和解說.
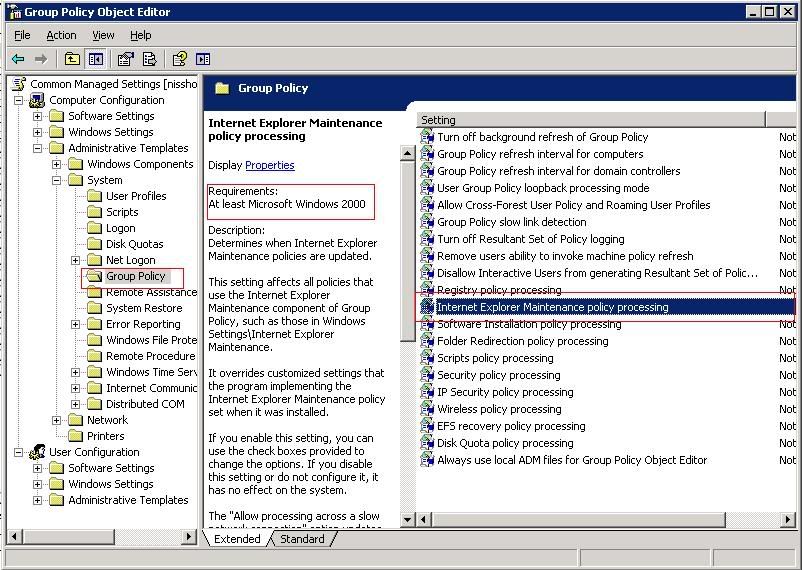
3.編輯完畢後, 關閉這個視窗
D.連接GPO
1.到要連接部份,可以是Root或OU,右擊, 選擇Link an existing GPO
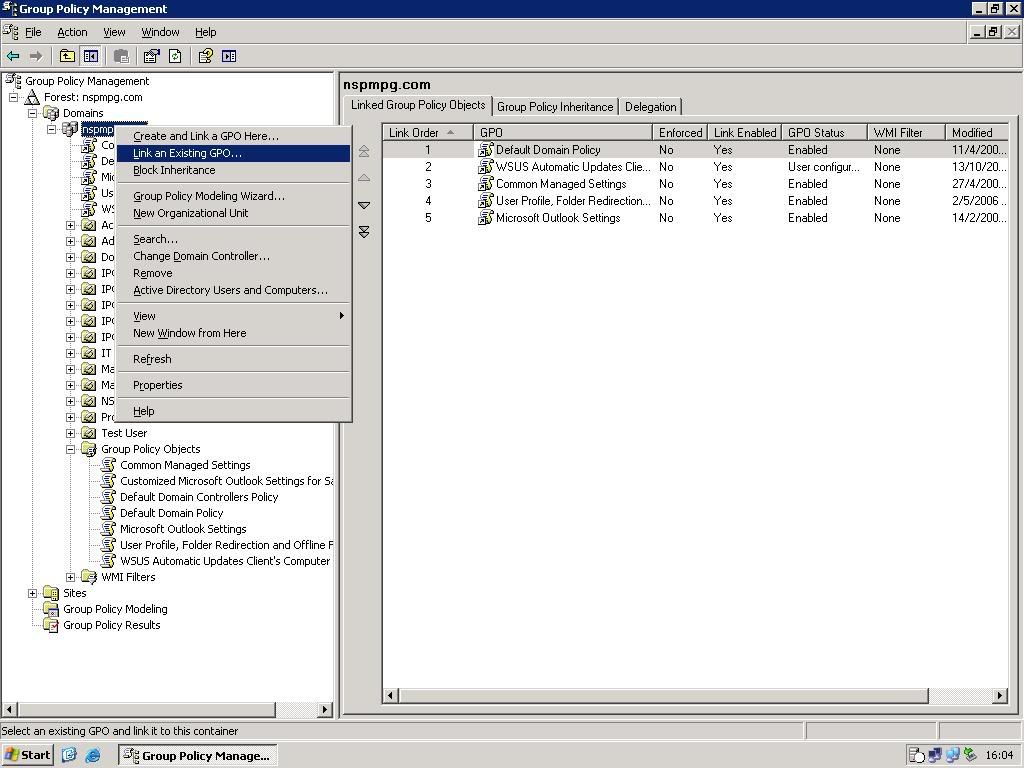
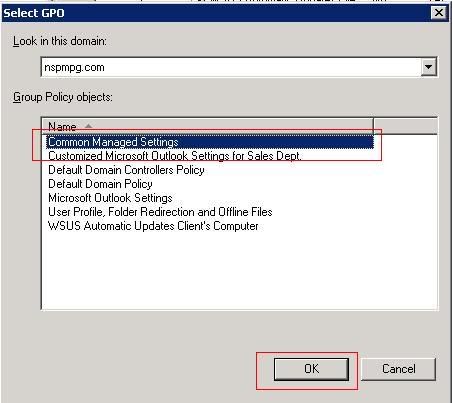
2.選擇要連接的GPO,按OK確定.當你選擇後,那個GPO就會開始生效,生效期限可能需要使用重新登錄,或者需要Domain Controller更新現有的GPO狀態.
3.如果你要Server馬上將剛連接的GPO生效,打開Command Prompt.輸入:
gpupdate/force
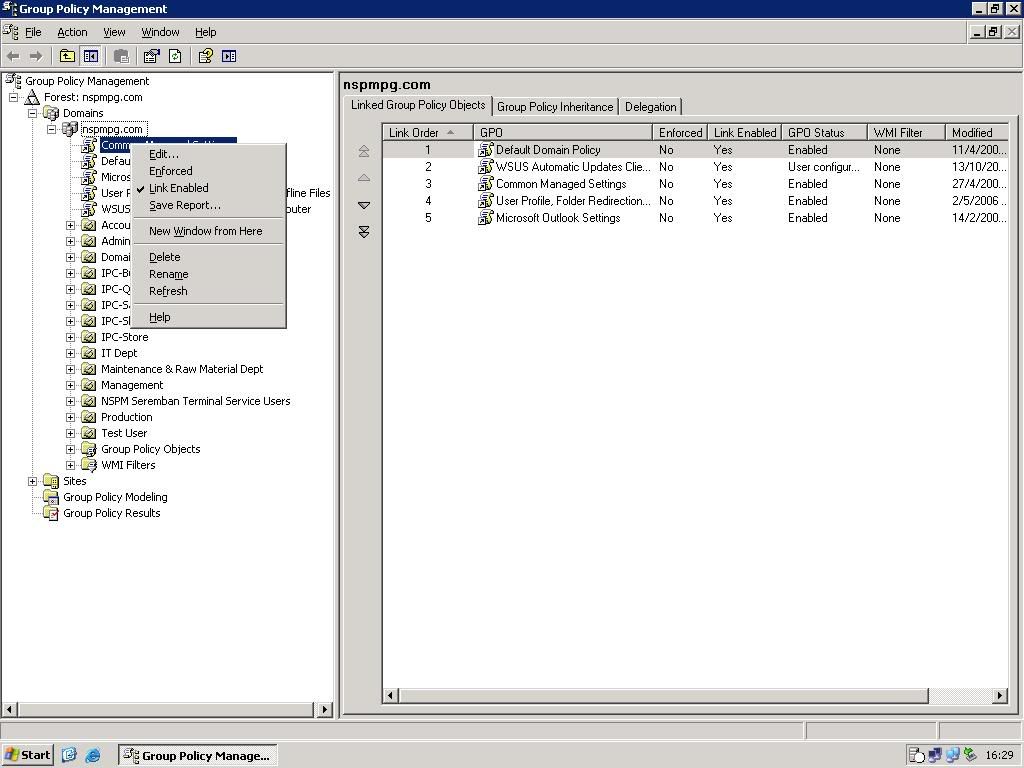
E.反連接GPO
1.右擊已連接的GPO,將Link Enabled不要打勾.
E.備份GPO
1.右擊Group Policy Object,選擇Backup all
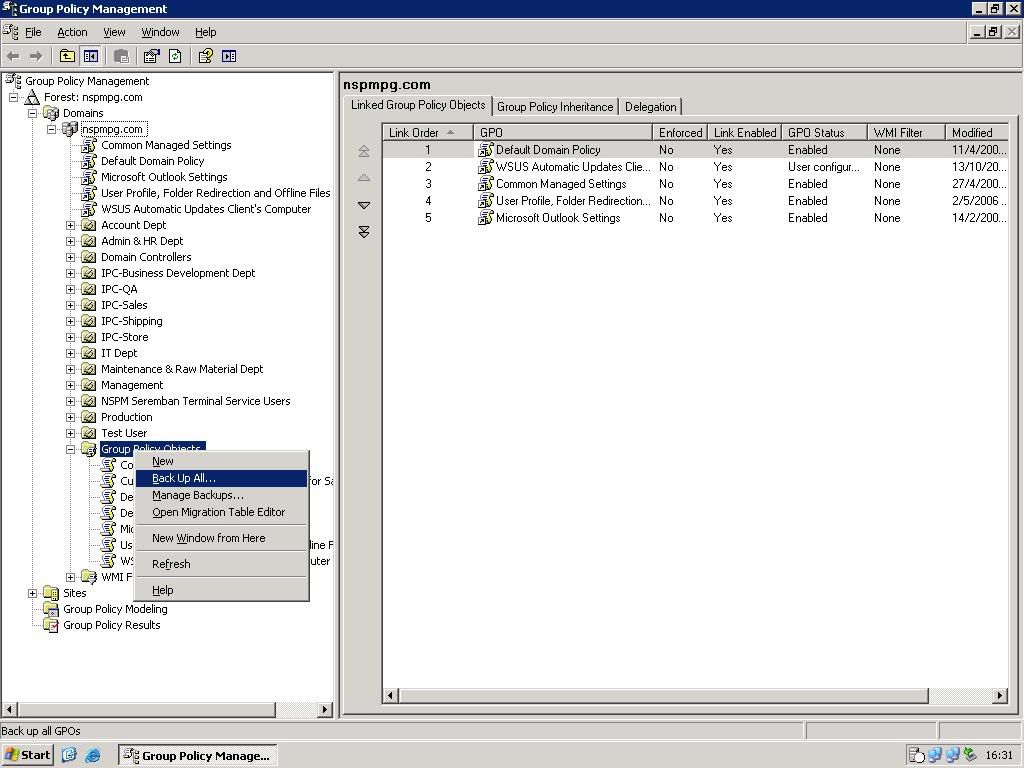
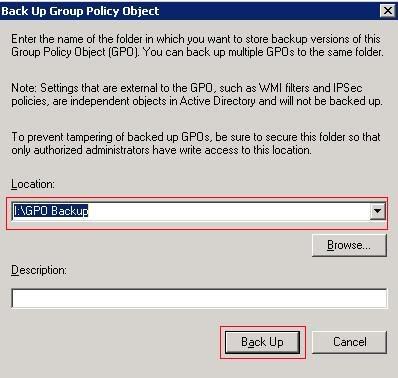
2.選擇要備份的目錄,然後選擇Backup all
創作完成﹗2006年5月19日下午5時
[ 本帖最后由 goolb78 于 19-5-2006 04:52 PM 编辑 ] |
|
|
|
|
|
|
|
|
|
|
|
楼主 |
发表于 19-5-2006 09:34 PM
|
显示全部楼层
補助篇1 Folder Redirection & Offline Files GPO
目的:自動轉移使用者的My Documents, Desktop, Application Data至Shared Folder.每個使用者只能讀寫自己的文件夾,他人不能更改.這樣作目的是集中備份(Centralized Backup)和保護(Protect)所有使用Active Directory的Windows 2000/XP Client Computer資料.
1.準備好需要的硬碟空間(HDD Spaces),教育使用者將所有個人資料都儲存在My Documents裡面.
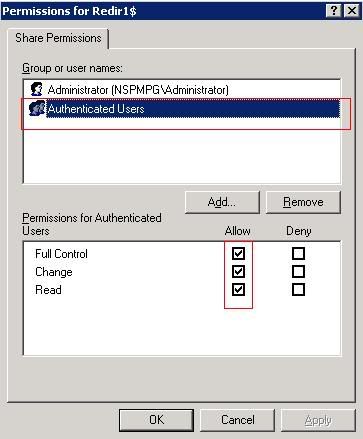
2.在Server里, 建立一個共享文件夾, 命名為Redir1$, $代表這個共享文件夾是隱藏的,不能直接在My Network Places或Network Neighborhood里直接可以看到.

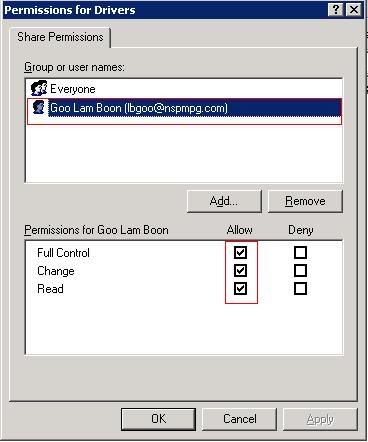
3.在Permission選項,加入Authenticated Users, 容許Full Control, Change, Read.
4.在Security選項里,加入Authenticated Users,容許Authenticated Users可以使用他們自己的文件夾.

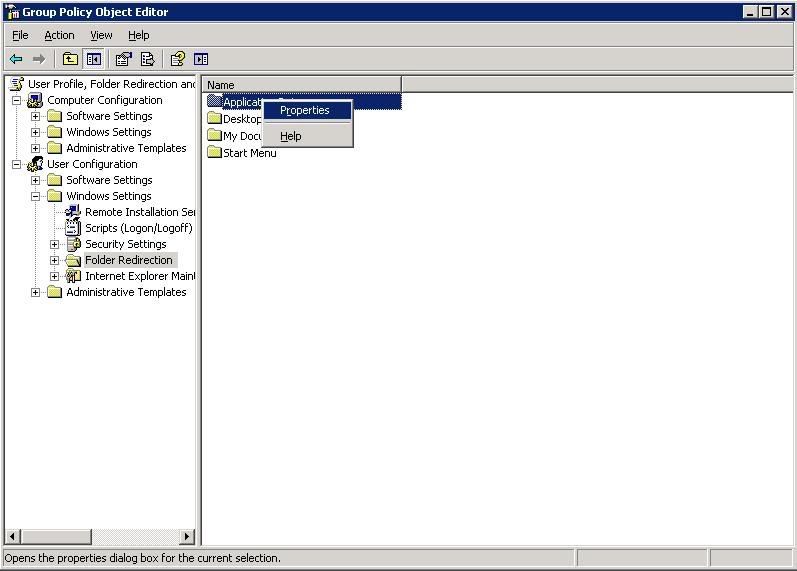
5.建立新的GPO,命名為Folder Redirection & Offline Files. 在User Configuration -> Windows Settings -> Folder Redirection,右擊Application Data.
6.
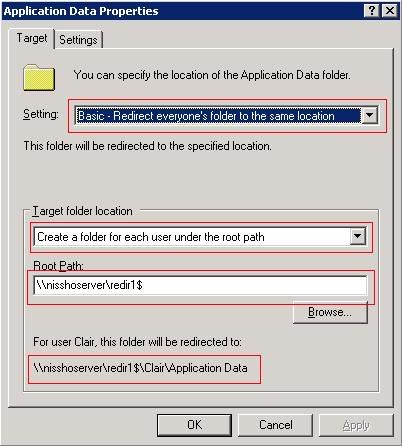
Settings: Basic-Redirect everyone's folder to the same location
這個選擇會自動將每個使用者的Application Data文件夾放入Redir1$共享文件夾.
Target folder location: Create folder for each user under root path
這個選擇會自動製造每個使用者的文件夾.
Root Path: \\nisshoserver\redir1$
共享的文件夾名稱.
7.
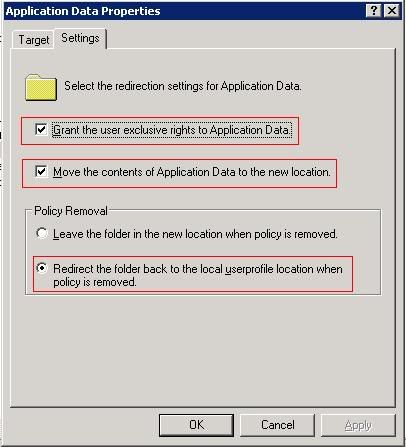
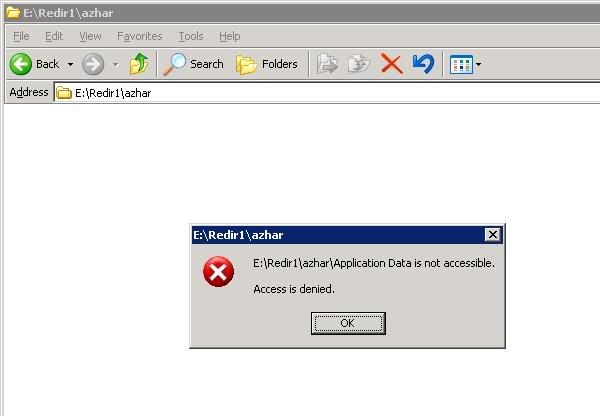
打勾: Grant the user exclusive rights to Application Data
設定只有該使用者才能讀取自己的Application,其他使用者,無論是Administrator也不能管理和閱讀它們.
打勾: Move the content of Application Data to the new location
Application Data的位置自動地會隨著新文件夾而移動
選擇: Redirect the folder back to the local userprofile location when policy is removed.
當這個GPO被移除後,Application Data會自動的轉移自每個使用者的Client Computer中.
8.按OK儲存設定.
9.在User Configuration -> Windows Settings -> Folder Redirection,右擊Desktop.
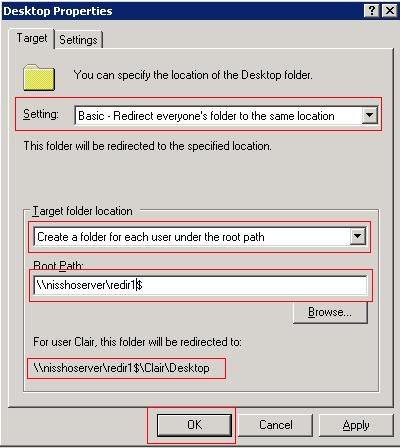
Settings: Basic-Redirect everyone's folder to the same location
這個選擇會自動將每個使用者的Desktop文件夾放入Redir1$共享文件夾.
Desktop這裡包括了shortcut和使用者在Desktop的文件夾,因為很多使用者喜歡將自己的文件放在Desktop.
Target folder location: Create folder for each user under root path
這個選擇會自動製造每個使用者的文件夾.
Root Path: \\nisshoserver\redir1$
共享的文件夾名稱.
10.
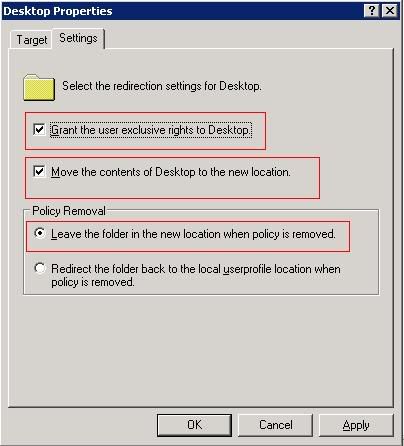
打勾: Grant the user exclusive rights to Desktop
設定只有該使用者才能讀取自己的Desktop,其他使用者,無論是Administrator也不能管理和閱讀它們.
打勾: Move the content of Desktop to the new location
Desktop的位置自動地會隨著新文件夾而移動
選擇: Leave the folder in the new location when policy is removed
Desktop的位置還是在Server裡面就算GPO已經被移除
11.按OK儲存設定.
12.在User Configuration -> Windows Settings -> Folder Redirection,右擊My Documents.
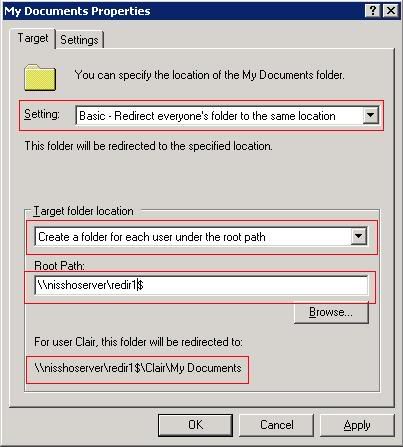
Settings: Basic-Redirect everyone's folder to the same location
這個選擇會自動將每個使用者的My Documents文件夾放入Redir1$共享文件夾.
Target folder location: Create folder for each user under root path
這個選擇會自動製造每個使用者的文件夾.
Root Path: \\nisshoserver\redir1$
共享的文件夾名稱.
13.
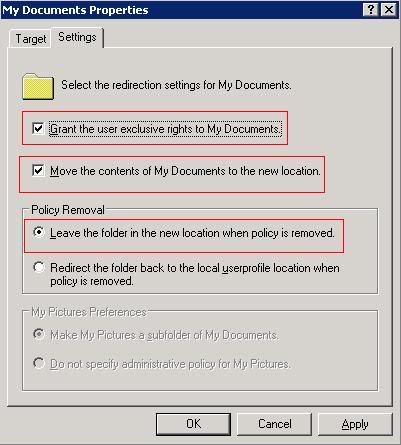
打勾: Grant the user exclusive rights to My Documents
設定只有該使用者才能讀取自己的My Documents,其他使用者,無論是Administrator也不能管理和閱讀它們.
打勾: Move the content of My Documents to the new location
My Documents的位置自動地會隨著新文件夾而移動
選擇: Leave the folder in the new location when policy is removed
Desktop的位置還是在Server裡面就算GPO已經被移除
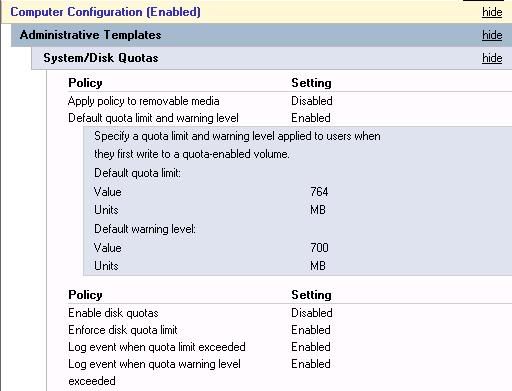
14.按照圖下的設定,編輯Computer Configuration -> System -> Disk Quota
15.按照圖下的設定,編輯UserConfiguration -> Administrative Templates -> Network -> Offline Files
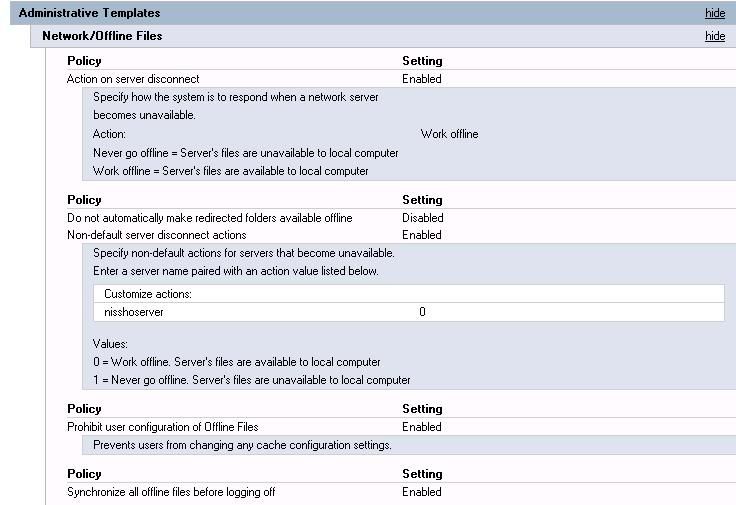
16.關閉這個GPO,然後連接(link) GPO在Root,這個GPO在使用者下次登錄時就會生效.
17.使用這個GPO的Client Computer

Desktop shortcut已經轉移至Server
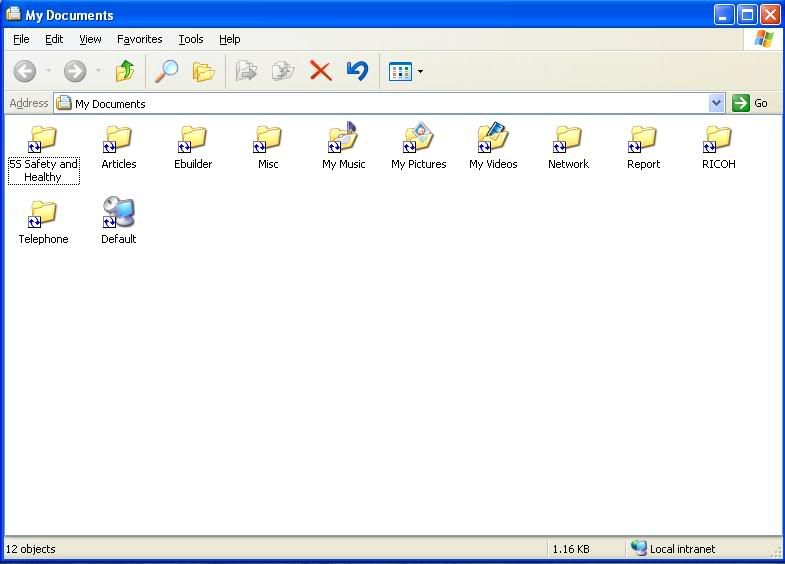
My Documents已經轉移至Server
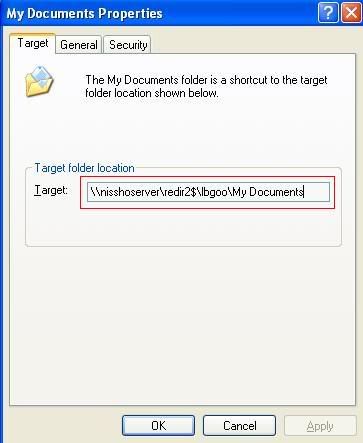
My Documents的文件夾被保護,不能更改
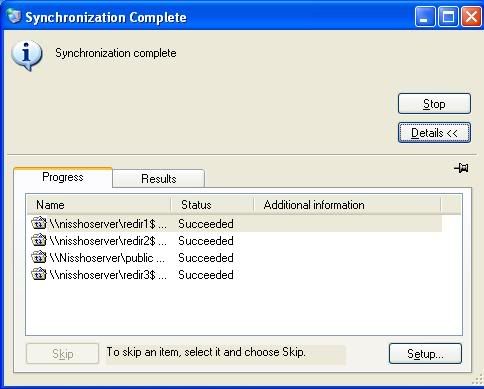
Synchronize Folders and Files
[ 本帖最后由 goolb78 于 22-5-2006 11:36 AM 编辑 ] |
|
|
|
|
|
|
|
|
|
|
|
 发表于 19-5-2006 11:49 PM
|
显示全部楼层
发表于 19-5-2006 11:49 PM
|
显示全部楼层
因樓主對此帖要求重心整理,所以在之前的一些對話我在此刪除。
另外,此帖加入為精華III和加400分作爲獎勵。 |
|
|
|
|
|
|
|
|
|
|
|
楼主 |
发表于 20-5-2006 01:50 AM
|
显示全部楼层
|
|
|
|
|
|
|
|
|
|
|
楼主 |
发表于 22-5-2006 09:23 AM
|
显示全部楼层
|
|
|
|
|
|
|
|
|
|
|
发表于 13-6-2006 09:59 AM
|
显示全部楼层
我的client拿不到IP。
server已经authorise了,还搞了set dnscredentials username domain password
在authorise,也是一样。 |
|
|
|
|
|
|
|
|
|
|
|
发表于 13-6-2006 12:37 PM
|
显示全部楼层
有一个小问题
我的公司的domain是 abc.com
公司的website 是www.abc.com
现在win2k以上的电脑不能上我的公司的website
有办法吗?
听说rename domain 可以做到, 有建议吗? |
|
|
|
|
|
|
|
|
|
|
|
发表于 13-6-2006 01:06 PM
|
显示全部楼层
|
|
|
|
|
|
|
|
|
|
|
发表于 13-6-2006 01:37 PM
|
显示全部楼层
原帖由 cipher3344 于 13-6-2006 12:37 PM 发表
有一个小问题
我的公司的domain是 abc.com
公司的website 是www.abc.com
现在win2k以上的电脑不能上我的公司的website
有办法吗?
听说rename domain 可以做到, 有建议吗?
不用这么麻烦~~~
你去DNS那里~~~
然后到你的forward lookup zone的abc.com~~~
再到旁边的空白之处~~~
right click --> new host~~~
在name那里打www~~~然后把你公司website的IP address打下去就可以了~~~
[ 本帖最后由 lesede 于 3-7-2006 08:40 AM 编辑 ] |
|
|
|
|
|
|
|
|
|
|
|
发表于 13-6-2006 01:59 PM
|
显示全部楼层
原帖由 lesede 于 13-6-2006 01:37 PM 发表
不用这么麻烦~~~
你去DNS那里~~~
然后到你的forward lookup zone的abc.com~~~
再到旁边的空白之处~~~
right click --> new host~~~
在name那里打www~~~然后把你公司的IP address打下去就可以了~~~
...
你偏心,我们认识这么久。 你既然不解决我的问题。  |
|
|
|
|
|
|
|
|
|
|
|
楼主 |
发表于 13-6-2006 02:25 PM
|
显示全部楼层
原帖由 hackintosh 于 13-6-2006 09:59 发表
我的client拿不到IP。
server已经authorise了,还搞了set dnscredentials username domain password
在authorise,也是一样。
可否捉個圖來看看一下﹖你的網絡是否只有一個DHCP Server? |
|
|
|
|
|
|
|
|
|
|
|
发表于 13-6-2006 02:56 PM
|
显示全部楼层
|
|
|
|
|
|
|
|
|
|
|
发表于 13-6-2006 03:42 PM
|
显示全部楼层
|
|
|
|
|
|
|
|
|
|
|
发表于 13-6-2006 05:00 PM
|
显示全部楼层
原帖由 lesede 于 13-6-2006 01:37 PM 发表
不用这么麻烦~~~
你去DNS那里~~~
然后到你的forward lookup zone的abc.com~~~
再到旁边的空白之处~~~
right click --> new host~~~
在name那里打www~~~然后把你公司website的IP address打下去就可以了 ...
expert就是expert
再来
如果要收pop和smtp的mail
是不是一样的方法?
pop和smtp的ip是不是一样?
不好意思,麻烦你! |
|
|
|
|
|
|
|
|
|
|
|
发表于 13-6-2006 05:05 PM
|
显示全部楼层
原帖由 lesede 于 13-6-2006 03:42 PM 发表
对不起~~~
之前没看到你的问题~~~
再说我也不会答~~~
你的client有什么error msg吗???
limited network connection还是Private IP address???
limited or no connectivity ,黄色的感叹号 |
|
|
|
|
|
|
|
|
|
| |
 本周最热论坛帖子 本周最热论坛帖子
|


 变色卡
变色卡 千斤顶
千斤顶


 3104
3104  51
51